Thursday, March 28, 2013

Gluten Free Vegan Zucchini Bars

          Before I became a food allergy mom, I always bake snack treats for my children.  It's my sneaky way of making sure the kids especially Child #2 eat vegetables and fruits.  The zucchini bars or Z bars as we call it, are a staple in their lunch bag. The original recipe that I developed for these bars is loaded with fresh veggies, applesauce and has reduced amount of sugar.  Something that makes me smile every time they ask for another slice.  (wink, wink)
 
           When we started to convert to a gluten free lifestyle and eliminate the food allergens of the kids, I spent a lot of time researching and trying flour combinations to recreate these Z bars.  Unlike carrots or apples, I found out that zucchini tends to be less forgiving and temperamental if prepared without eggs and wheat.
 
            After some or should I say many trial and error baking sessions, I finally came up with this new Z bars.  This recipe produces a very moist cake-like texture making it really addictive.  It is not very sweet so it's fine kick it up a notch by serving it with some frosting or even buttery spread.  If you are able to get young fresh zucchini, you can use it with the skin on. Otherwise, I suggest peeling some of the skin off because it will leave a bitter after taste. 
 
           Give this recipe a try, you can even use it for a birthday cake.  I'm pretty sure your family will love it as much as we do. 

           Enjoy!

-Rozelyn


Ingredients:

3/4 cup canola oil
1/4 cup unsweetened applesauce
1 cup sugar
3 Tbs. flax meal
9 Tbs. lukewarm water
2 1/4  cups grated zucchini
2 1/4 cups Gluten Free Flour Mix (see it here)
2 tsp. baking soda
1 tsp. baking powder
1/2 tsp. salt
2 tsp. ground cinnamon
1 tsp. ground nutmeg
2 tsp. vanilla extract

1. Preheat oven to 350 degrees.  Line a 9x13 pan with aluminum foil or parchment paper and lightly grease with oil.
2. Make flax goo by combining flax meal and water in a small bowl.  Set aside for at least 5 minutes before using.
3.  In a big bowl, whisk gluten free flour mix, cinnamon, salt, baking soda, baking powder and nutmeg.
4. Using a mixer, cream the oil, sugar and flax goo for about 2 minutes or until well incorporated. 
5. Then add the vanilla extract and zucchini.
6. With the mixer running on low, slowly add the flour mixture.  Don't over mix.
7. Pour the batter on the prepared pan and bake in the oven for 50 - 70 minutes. The bars are done when a toothpick is inserted in the middle of the pan it comes out clean.
8. Move the pan on a wire rack and let the cake cool completely before cutting and frosting.

Monday, March 25, 2013

Finally A Dairy Free Chicken Alfredo Pasta

      Chicken Alfredo is one of my favorite pasta dishes.  There is something so comforting about the creamy, salty and cheese laden sauce that makes it such a special treat.  So when the food allergy news broke, I thought I will never have the chance to cook this yummy pasta dish at home anymore. 
     
       One day, while preparing for dinner, my children started asking for a white pasta sauce. Just my luck.  How can I possibly make a cream sauce without cream or milk? I'm pretty sure coconut milk, unsweetened rice or almond milk will not be a good alternative because these kids know what an Alfredo sauce should taste like.  Cream cheese even the vegan one is out of the question too because of the soy content. Challenging? Oh yeah.  Impossible? I don't think so. 
 
        While looking for the can of anchovies in the pantry, (Yes! I put some anchovies in my regular Alfredo sauce.) I accidentally came across this can of cannellini beans.  Light bulb moment!  If I can make these beans really creamy and add enough flavor, I might be able to get a taste close to our beloved cream sauce.  So where do I get this weird idea? Okay, I confess, I have an obsession with the show Chopped and it looks like it's paying off. :D
 
        After a few tinkering, I finally came up with this recipe.  Take note that I didn't use any salt because the anchovies gave it the much needed flavor.  If you are not into anchovies, you can use bacon instead.  Simply put raw bacon pieces (about 5 stripes) in a big pan and cook until you have about 2 Tbs. of bacon grease. Remove the cooked bacon and use the grease to sauté the sundried tomatoes and make the sauce.  Once the dish is done, crumble the bacon and sprinkle on top.  You may have to add some salt in the sauce because the bacon doesn't have the same salt content as the anchovies. 
 
        Give this one a try, it's a little healthier than the original Alfredo Sauce too. Who knew cooking food allergy friendly dishes is starting to be fun?
 
        Happy Monday!
 
- Rozelyn


Ingredients:

1 15 oz. can cannellini beans
4 cloves garlic
1 1/2 cup chicken broth
1 tsp. extra virgin olive oil
1 2 oz. can anchovies in Extra Virgin Olive Oil
1 cup cooked chicken breast (sliced thinly)
1/2 tsp. nutmeg
1/2 tsp. onion powder
1/2 tsp. ground black pepper
4 oz. Daiya jack style cheese (shredded)
2 Tbs. sundried tomatoes chopped
3 Tbs. fresh sage chopped
1 lb. gluten free pasta of your choice (cooked according to package direction)
* some pasta liquid (water where you cooked the pasta)

1. Using a blender or food processor, puree the beans, garlic and broth until really smooth and creamy. Set aside.
2. In a big pot, sauté the anchovies in olive oil until it turns into a paste. Mix in the sundried tomatoes and let the flavors blend for about 2 minutes.
3. Add the pureed bean mixture, chicken and season with black pepper, nutmeg and onions powder.  Bring to boil.
4. Lower heat and add shredded Daiya cheese substitute.  Mix well until the cheese melts.  Taste and adjust seasonings if necessary. If needed, add some salt.
5. Add the cooked pasta and stir to coat with the sauce. 
6. Turn off heat and sprinkle the chopped sage.
7. Serve hot. 

Tips:
      If the sauce is too thick, add some pasta water. 
      Puree the beans really well and simmer it for at least 10 minutes to remove the grainy texture.
     

Friday, March 22, 2013

Friday Freebie Finds - Gluten Free, Paleo Ebooks and more

       Hello Frugalista Moms!  This weird Jersey weather is just driving me crazy.  It's officially the third day of Spring yet our temperature here is still below freezing.  The wind isn't a big help either.  On top of that, my allergies are kicking it --- sneezing, watery eyes, runny nose.  You know the drill. 
 
       Since I'm taking a break from cooking today, I decided to look around the web for interesting ebooks to read.  Oh did I mention that these are all FREE today too? Just download, read and decide whether you like to keep them or simply delete. 
 
       I know you are all excited so I will not take long.  Plus I can feel the zyrtec is taking effect now.  Hope you all have a happy weekend!
 
- Rozelyn


Wednesday, March 20, 2013

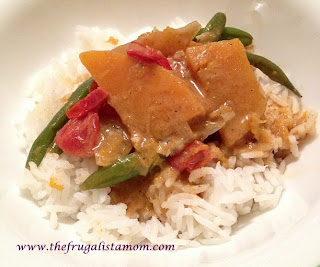
Butternut Squash & String Beans in Coconut Curry Sauce

      It's the First day of Spring!  To celebrate, I am sharing with you a vegan dish that my whole family loves.  Even before we eliminated wheat, egg, dairy, soy, nuts and peanuts in our diet due to my children's multiple food allergies, this vegetable dish has already been a staple in our monthly menu.  
 
      This hearty dish is very easy to prepare but loaded with flavor and different textures.  Since our family is not really vegetarians, I serve this with either fried meat spring rolls (lumpiang shanghai) or grilled pork/chicken skewers (Filipino BBQ) and rice.  The creamy sauce with a hint of sweetness from the squash works quite well with any grilled protein. Am I making you hungry already?
 
       Anyway, I hope you'll give this humble dish a try. 
 
      Have a great Spring!
 
- Rozelyn 


Ingredients:

3 Tbs. olive oil
1 tsp. garlic minced
1/2 cup white onions sliced in half moon shape
1 pint grape tomatoes cut in half
2 tsp. garam masala
2 tsp. ground ginger (powder form)
1 14 0z can coconut milk
1 cup broth (you can use chicken or vegetable broth)
1 1/2 lbs. string beans cleaned
1 1/2 lbs. butternut squash skin and seeds removed and cut into 1 inch cubes
3 Tbs. sea salt
1/4 tsp. ground black pepper
1/4 tsp. cayenne pepper
1 tsp. curry powder

1. In a big pan, heat olive oil. 
2. Saute the garlic, onions and tomatoes until the onions are translucent and the tomatoes are almost turned to a paste.
3. Add the garam masala, curry powder and ginger powder.  Mix well and cook for about 3 minutes.
4.  Stir in the coconut milk and broth.  Bring to slow boil. 
5.  Once the sauce starts to boil, add the string beans.  Cover the pan and let cook for 5-7 minutes or until the green beans are half cooked.
6. Add the butternut squash and season with 2 Tbs. salt, black pepper and cayenne pepper. Cover the pan and simmer until the squash and beans are cooked about 10 to 15 minutes.  Do not over cook. 
7. Taste and see if you need to add the remaining 1 Tbs. of salt.  I have used a salt free homemade stock that's why I need the additional salt.  Just remember that ready made broth has additional salt so taste before you add more. 
8.  Turn of heat and serve warm over rice, noodles or as a side dish.

Tip:
     Removing the skin and cutting the butternut squash can be a challenge.  To make the preparation easier, place the gourd on a microwaveable plate and heat it on high for 2 -3  minutes. Let it cool a bit before opening. This will soften the squash making it easier to cut.   

Tuesday, March 19, 2013

Sugar Plum Fruit?

      I confess I am not a big fruit and vegetable eater.  As far as I can remember, I always gave my parents a hard time when it came to this food group.  So when two of my children turned out to be picky plant eaters, I wasn't surprise at all. 
 
      Though I can't literally force my non herbivore kids, I love to bring them to the Farmer's Market.  This gives them the opportunity to see various fruits and vegetables. Hopefully, the colors will get them curious enough to try to taste something new. 
 
       Yesterday was a special discovery day.  Did you know that there is an actual fruit that's called Sugar Plum?  All the while, we thought sugar plums just exist on children's story books.  Does Sugar Plum Princess or Fairy ring a bell? 
 
        Anyway, this fruit that looks like a big red grape which has a big pit in the middle is a must try.  It's juicy and tastes like a very sweet nectarine. My 2 fruit eaters love it.  I even got hooked.  Child #2 and #4 even tried it without hesitation.  Will they eat it again?  I'm not sure but it's definitely worth a shot.
       
        Have you tried these Sugar Plums?  Did you like it?  Love to hear from you.
 
- Roz 


Sunday, March 17, 2013

Living a Gluten Free Life Ebook


      New to Gluten free lifestyle?  Hurry and grab a copy of this e-book before the price goes up. This 72 page book is loaded with basic information such as what Gluten is, differences of Allergy, Intolerance and Celiac Disease, food label guide and even recipes for pizza crust, muffins, scones and more. 
 
     Take note I haven't tested the included recipes but they seem so easy to make.  A big plus too is that it provides 3 recipes for Gluten Free flour mixes that you can make from home.  Thus saving you more money. 
 
     What are you waiting for?
 
 
- Roz

Saturday, March 16, 2013

Best Vegan Banana Snack Cake - Without Gluten and Soy Too

      When I first learned about my children's food allergies, I didn't worry much about regular meals.  Since our family are big rice and stew eaters, I know the changes will not be as drastic. My head started spinning however, on how will I replace their favorite baked goods. 

       I am not from the South but I always have some baked goods on hand.  Snack cakes in particular are a mainstay in our kitchen.  Sounds unhealthy?  Not really! In fact, I bake those little treats to make my kids especially Child #2 and Child #4 eat more veggies and fruits.  

       Before their food allergy diagnosis, I make snack bars loaded with zucchini, carrots, apples, or whatever vegetable or fruit purees I can get my hands on.  We even came up with weird names such as Z bar and Monkey bar just to hide what's inside that treat from my pickiest vegetable/fruit eater.  Call me crazy but I did that just to give the kids their recommended amount of the healthy stuff without much fight.

       When the doctor told me to remove Wheat, Egg, Dairy, Peanut, Nut and Soy in our diet,  I was like "Are you kidding me?  How can I possibly bake something without those ingredients?" After a few months of trial and error, I'm slowly learning to bake again. 

      So far, this recipe for a Banana Snack Cake is hands down the best we've had since our diet change.  Texture wise, it's soft and moist, you wouldn't even think it's free of eggs and gluten.  Just frost it and decorate, you'll have a yummy allergy friendly birthday cake in no time.  You can even make regular cupcakes using the same batter by adjusting the baking time to 16 - 18 minutes.

       Please take note that I specifically use a certain flour mix for this recipe.  Though there are so many ready made gluten free  flour mixes available out there, some great, not so great and some meltdown worthy, especially if you can't use eggs, I decided to take the guess work out for you.

       Food allergies or not, I hope you'll give this one a try.  If you do, just don't forget to let me know. 

      Have a great weekend!

- Roz


Ingredients:
3 Tbs flax meal
9 Tbs lukewarm water
1 cup sugar
1/2 cup canola oil
2 3/4 cups mashed very ripe bananas
1 Tbs mayonnaise (I used Vegenaise Soy free)
2 tsp vanilla
1 1/2 tsp baking powder
1 tsp baking soda
2 cups Gluten free flour mix (See below)
1/2 tsp salt
1/4 cup flax milk
1/4 tsp rice vinegar
extra oil to grease the pans

1. Preheat oven to 350 degrees. Line 2 9-inch pans with aluminum foil and lightly grease with oil.
2. Combine flax meal and water in a small bowl to make flax goo. Set aside.
3. In a separate container, mix vinegar and milk. Set aside.
4. Sift the gluten free flour mix, baking powder, salt and baking soda in another bowl.
5. Using an electric mixer, cream the oil and sugar for about 2 minutes.
6. Add the flax goo, mashed bananas, mayonnaise and vanilla. Mix until well combined.
7. With the mixer running on low, alternately add the flour mix and milk mix.  Start with 1/3 of the flour and 1/2 of the milk.  Make sure to end with the flour mix. 
8. Divide the batter to fill the two pans.
9. Bake in the oven for 25 - 28 minutes.  Use the toothpick test to check if it is done.  (Poke the middle of the cake with a toothpick.  When the toothpick comes out clean, the cake is ready.)
10. Transfer to a rack and let it stand for 5 minutes before lifting it from the pans.
11. Let it cool completely before frosting or cutting into bars.

Gluten free Flour Mix c/o Connie Sarros
2 1/2 cups rice flour
1 cup potato starch
1 cup tapioca flour
1/4 cup mung bean flour
2 Tbs. xanthan gum

Sift together, transfer in an airtight container and store in a cool dry place.  Above measurements will give you 5 cups of GF Flour mix.
* Except for the xanthan gum, all these flours are individually available at your local Asian store.  They are very affordable ($1 -$3 a bag and watch out for sale too) and you'll have more than enough to use for other recipes. 

Friday, March 15, 2013

Mussels in Coconut Lime Broth

        What an exciting week it was!  Just two days ago, I was one of the thousands who were glued to their televisions once the white smoke came out of Sistine Chapel.  Excited to witness another piece of history, I patiently waited for the new Pope to come out of the balcony from 2:05 -2:55 pm.  Guess what?  Nobody came out. 
 
         Since I have some chauffer duties to do, I rushed to the car and hurriedly picked up the children from school.  Deep inside, I'm hoping the Pope will not make his grand entrance during my 15 minute absence. When I saw the kids,  I even told them that the first one home will get a treat.  The little trick paid off.  They were in and out of the car in no time. 
 
        As I was closing the front door, I heard the kids screaming.  "Hurry Nanay, the new Pope  came out of the balcony!"  Just my luck!  I was 5 seconds late for the big reveal.  Bummer!!!
 
        Speaking of luck, this weekend is St. Patrick's Day.  Though we don't have any trace of Irish blood in our family (as far as I know),  we also like to celebrate the occasion by having "Green foods" with the traditional Beef, Potatoes and Cabbage. 
 
        One of our family's favorite Green foods is this Mussels in Coconut Lime Broth.  Though the kids are not big mussels eaters, they love soaking their steamed rice with the light, creamy broth.  That leaves me and my husband more mussels to enjoy with wine or beer. Yum!
 
         What I love the most about this simply dish aside from the taste, is its versatility.  Depending on how you serve it, this easy to prepare recipe is perfect for entertaining.  As a cocktail dish, arrange the mussels in a platter and use the broth as a sauce. Just like the one on the photo below.  A few pieces of mussels in a bowl with more broth and a piece of toast, you have a nice soup.  For an elegant looking main dish, serve it with steamed rice and vegetables.  
 
        Am I making you hungry?  Here's the recipe for this 30 minute wonder. 
 
        Time to enjoy Happy Hour!
 
- Roz
 

Ingredients:

2 Tbs. extra virgin olive oil
1 Tbs. minced garlic
1 small onion chopped
2 inch cube fresh ginger sliced into strips
2 cans 14 oz. coconut milk
1 cup water
3 lbs. mussels
2 Tbs. fish sauce
1/2 tsp. chili flakes (you can add more if you like)
1 1/2 tsp. ground black pepper
1/2 cup fresh cilantro chopped
1/3 cup fresh lime juice

1. Preheat a big Dutch over or pan. 
2. Sautee garlic, onions and ginger in olive oil for about 3-4 minutes.  Make sure you don't burn it.
3. Add the coconut milk, water, fish sauce and black pepper.  Bring to boil.
4. Once boiling, add the mussels and lower the heat.  Simmer until the shells open.  Do not over cook.
5. Stir in the cilantro, chili flakes and lime juice.  Turn off heat and serve.
 

Tuesday, March 12, 2013

All Around Beef Ragu - Food Allergy Friendly

         Hello Frugalista Moms!  It's crazy Tuesday once again.  You know that day of the week when everyone in the family is rushing from one activity to the next. Child #2 has this at 4 pm while Child #1 needs to be there at 5:30 pm, pick up Child #3 at.... and so on. 

         Pre-food allergy diagnosis, this is the day wherein the fastfood drive thru window is my best friend.   A lot has changed though.  With a little planning and sometimes the help of my new BFF (the slowcooker),  I can have dinner, snack and even next day the children's lunch covered. 

         One of my ever reliable recipes is this easy Beef Ragu.  This basic recipe is so versatile, a bunch of new dishes can be made from just a big pot of it such as:
           1. Serve on top of your favorite pasta  for Pasta & Meat Sauce
           2. Add some rinsed canned beans and chili powder - Easy Chili n Beans
           3. On top of corn chips and shredded Daiya cheddar style cheese  - Nachos
           4. With some rolls (gluten free of course!) - Sloppy Joe sliders
           5. On top of pizza crust  - Easy Meat Pizza

          Feel free to double the recipe too.  It freezes quite well. A great use for all those ground meat you bought on sale.  Plus you'll also have something waiting in the freezer for busy days such as my crazy Tuesday.  Wink.. wink... I always have some of these in 1 cup containers that I serve as a hearty dip for my growing happy eaters. 

        Happy cooking!

- Roz


Ingredients:

1 1/2 lbs ground beef
2 Tbs. olive oil
1 tsp garlic minced
1/2 cup onions chopped
1/2 tsp dried oregano
1/2 tsp dried rosemary
1/2 tsp dried thyme
1 28 oz can crushed tomatoes
2 Tbs course sea salt
1/2 tsp ground black pepper
3 Tbs fresh basil chopped

1. In a big pot, heat olive oil and brown the meat.
2. Once the ground beef has browned, add the garlic, onion, oregano, thyme, rosemary and tomatoes. Mix well and bring to a boil.
3. Season with 1 1/2  Tbs salt and ground pepper. 
4. Simmer for 30 - 90 minutes.  The longer you simmer it, the more flavorful it gets.  Mix every 10 minutes to prevent the sticking.
5. After your preferred simmering time, taste to make sure if you need the remaining 1/2 tsp of salt. Some canned crushed tomatoes have added salt.  The once I used only contains tomatoes that's why I need the extra 1/2 tsp.   Also, take note that I have used course salt in the recipe. 
6. Turn off heat, stir in the fresh basil and serve over pasta, rice and even steamed veggies. 

Quick tip:
     
       This recipe can easily be made in the crock pot. Just brown the meat before putting it in a slow cooker with the rest of the ingredients except the fresh basil. Season with 1 1/2 Tbs of salt instead of the mentioned 2 Tbs.  Mix in the basil just before serving.

Friday, March 8, 2013

30 Healthy Desserts You Can Eat Everyday Ebook


        Looking for ideas on Raw, Paleo, Gluten free and Vegan Desserts? Check out what I just got today at no cost. This Ebook by Nathalie Lussier features easy recipes without cooking or even baking. Isn't that great? Just a little heads up though, it contains a lot of nuts as ingredient so if you're allergic to any, you may find it frustrating.
 
        We are nut free at home too but since the download is free and I saw some quite interesting recipes, I think it's worth a try.  It's just a click anyway.
 
         If you want a copy, hurry grab one now before you have to pay for it!

         Have a great weekend!

-Roz


Thursday, March 7, 2013

Food Allergy Friendly Fudgy Bean Brownies - Gluten, Dairy, Egg, Nut and Soy Free

        It's been a while since I last posted a brownie recipe or product review.  As I have mentioned in my previous posts, the most challenging part of being in a gluten, dairy, egg, nut and soy free diet is baking.   Unlike cooking wherein you can easily alter the outcome of a dish, baking is an exact science.  It's not just a matter of using the tastiest ingredients, it is about having the right proportions, mixing technique, proper heat, timing and pan size.  That being said I totally understand why some are scared to try baking from scratch or even baking at all. 
 
        For us food allergy Frugalista Moms, the need to bake and recreate some well loved treats or snacks is a big must.  Baking our own desserts or breads is not only for savings purposes but most importantly to have safe food for our children. With that in mind, I would like to share with you the recipe for one of our family's favorite after school and even lunch box snack  - Bean Brownies. 
 
       This version was adapted from my original recipe Black Bean Butterscotch Brownies found in my previous blog.  Since I have to remove the eggs, it took me about a dozen attempts to make the texture as close to the original as possible. Give this yummy, healthy vegan treat a try.  I'm sure you and your child will never look at brownies the same way again. 
 
       Enjoy!
 
-Roz
 
 
Ingredients:
 
1 15 oz can black beans
1 cup sugar
1 tsp vanilla extract
3 Tbs flax meal
9 Tbs lukewarm water
1/4 cup oil (you can use canola, sunflower or corn oil)
1/2 cup cocoa powder
1/4 cup buckwheat flour
1/8 tsp sea salt
1 tsp cinnamon powder
1/2 cup mini chocolate chips (Enjoy Life)
 
1. In a small bowl, combine flaxmeal and water to make a flax goo.  Set aside.
2. Rinse beans in running water.  Drain.
3. In a blender or food processor, puree the black beans, sugar, vanilla and oil until smooth. 
4. Transfer the bean mixture in a big mixing bowl and add the salt, cocoa powder, buckwheat flour and cinnamon.  Mix until just combined.
5. Pour the batter in a 9x9 greased pan and sprinkle the chocolate chips on top.
6. Bake for 30-35 minutes in a heated oven with a temperature of 350 degrees.  Do not overbake. 
7. Remove from the oven when the sides pulls away from the pan or there is a gap between the cake and the pan. 
8. Cool completely before cutting into bars. 
 
Optional:
 
Coconut drizzle
        Combine 3 Tbs coconut milk and 5 Tbs powdered sugar and mix until you have a smooth and creamy consistency. Drizzle on top of cooled and sliced brownies.  Let it set for about 5 -10 minutes before serving.  Depending on your preference, you can thin it out more by adding a few drops of coconut milk at a time or make it thicker by adding more powdered sugar.      
      

Wednesday, March 6, 2013

March Healthy Reading - Salt, Sugar, Fat

        Hello food conscious Frugalista Moms!  Guess what I just found in the library today?  The controversial book Salt, Sugar, Fat by Pulitzer Prize Winner, investigative reporter Michael Moss. 


         I first heard about this book while watching a segment from the Dr. Oz show.  According to the author, food manufacturing giants such as General Mills, Kraft, Coca Cola, Nestle and more have always been aware of the effects of their processed food to the growing obesity epidemic here in the United States.  Instead of doing something to make convenient foods healthier to the consumers, these companies preferred to spend money on food scientists that enhance the taste of  their products and marketing experts to entice the buyers.
 
         Basically, what the writer wants to prove is that the processed food industry intentionally poisons the population for the sake of large profits. He even backed up his reporting with extensive research.  Quite interesting right?
 
         So, for this month's healthy reading, I decided to feature this intriguing food book.  At the end of the month or once I finished reading it, I will let you know my thoughts.  Would you like to join me in this journey?  Love to hear from you.
 
-Roz
 

Monday, March 4, 2013

Super Easy Double Chocolate Pancakes

        I believe moms will agree that breakfast is the most challenging meal of the day.  Not only are we rushing to get something done, we also think about whether the kids will actually eat and finish their food just in time for the bus.  Sad to say but most of the time, most skip this important meal. 

        Before my children were diagnosed with food allergies, I confess I often rely on ready made waffles and pancakes.  You know, the ones that you just microwave or pop in a toaster.  Though they lack in flavor and loaded with "what are those ingredients?", I still admit that they are affordable morning life savers. 

         Fast forward to gluten, dairy, egg, nut and soy free diet, breakfast is still chaotic. Since this time, most packaged food is a big no-no, I have learned to do some shortcuts especially for breakfast.


        This Double Chocolate Pancakes were actually made with our favorite allergy friendly mix -  Cherrybrook Kitchen Waffle and Pancakes mix.  Instead of adding plain milk, water or milk substitute, I replaced the amount required with Chocolate flavored almond milk.  Yes, my children can take almond milk (Thank God!). Then added a few Enjoy Life Mini Chocolate Chips on top of the pancakes while cooking in the griddle.  Flip and wala easy and delicious breakfast!

          If you can't tolerate Almond Milk, don't worry, you can use any milk alternative --- flax, soy, coconut or even regular milk (if you are not dairy free) and dilute 1/2 tsp cocoa powder for every 1 cup of milk. The chocolate chips add a hint of sweetness which lessens the need for any syrup.  Thus lower sugar consumption for the little ones. 

       Here's an extra tip too.  Make a big batch of these pancakes when you have extra time in the weekends.  Instead of regular sized pancakes, I make it about 2-3 inches in diameter.  I found out that the consistency of mini pancakes reheats better than the bigger version .  Once the flapjacks cool, stack it up and transfer to either a ziplock bag or reusable covered container.  These pancakes store well in the fridge for 7 days.  When someone wants a quick snack or breakfast, place preferred number of pancakes on microwavable plate (single layer) and nuke on high for 10-15 seconds.  

        Take note, I didn't say freeze for later use.  After some trial and error, I realized that freezing these previously prepared gluten free, allergy friendly pancakes do not produce nice results once reheated.  I am not sure if it's the brand or ingredients in the mix but if you like to try, let me know okay. 

        Have a great week Frugalista Moms!

-Roz       
 
Related Posts Plugin for WordPress, Blogger...