
Showing posts with label coconut milk. Show all posts

Wednesday, March 20, 2013

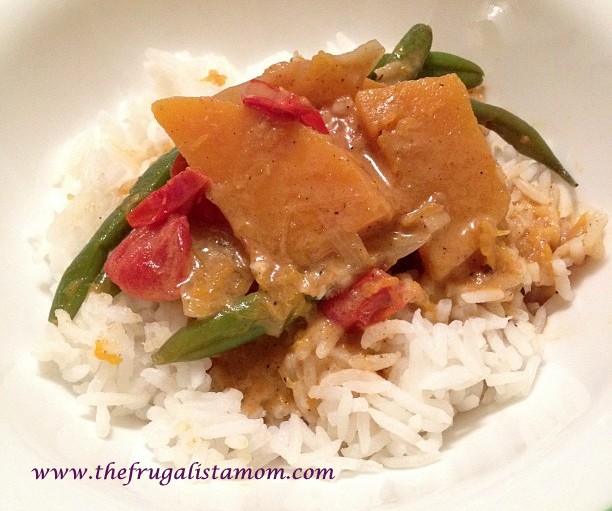
Butternut Squash & String Beans in Coconut Curry Sauce

      It's the First day of Spring!  To celebrate, I am sharing with you a vegan dish that my whole family loves.  Even before we eliminated wheat, egg, dairy, soy, nuts and peanuts in our diet due to my children's multiple food allergies, this vegetable dish has already been a staple in our monthly menu.  
 
      This hearty dish is very easy to prepare but loaded with flavor and different textures.  Since our family is not really vegetarians, I serve this with either fried meat spring rolls (lumpiang shanghai) or grilled pork/chicken skewers (Filipino BBQ) and rice.  The creamy sauce with a hint of sweetness from the squash works quite well with any grilled protein. Am I making you hungry already?
 
       Anyway, I hope you'll give this humble dish a try. 
 
      Have a great Spring!
 
- Rozelyn 


Ingredients:

3 Tbs. olive oil
1 tsp. garlic minced
1/2 cup white onions sliced in half moon shape
1 pint grape tomatoes cut in half
2 tsp. garam masala
2 tsp. ground ginger (powder form)
1 14 0z can coconut milk
1 cup broth (you can use chicken or vegetable broth)
1 1/2 lbs. string beans cleaned
1 1/2 lbs. butternut squash skin and seeds removed and cut into 1 inch cubes
3 Tbs. sea salt
1/4 tsp. ground black pepper
1/4 tsp. cayenne pepper
1 tsp. curry powder

1. In a big pan, heat olive oil. 
2. Saute the garlic, onions and tomatoes until the onions are translucent and the tomatoes are almost turned to a paste.
3. Add the garam masala, curry powder and ginger powder.  Mix well and cook for about 3 minutes.
4.  Stir in the coconut milk and broth.  Bring to slow boil. 
5.  Once the sauce starts to boil, add the string beans.  Cover the pan and let cook for 5-7 minutes or until the green beans are half cooked.
6. Add the butternut squash and season with 2 Tbs. salt, black pepper and cayenne pepper. Cover the pan and simmer until the squash and beans are cooked about 10 to 15 minutes.  Do not over cook. 
7. Taste and see if you need to add the remaining 1 Tbs. of salt.  I have used a salt free homemade stock that's why I need the additional salt.  Just remember that ready made broth has additional salt so taste before you add more. 
8.  Turn of heat and serve warm over rice, noodles or as a side dish.

Tip:
     Removing the skin and cutting the butternut squash can be a challenge.  To make the preparation easier, place the gourd on a microwaveable plate and heat it on high for 2 -3  minutes. Let it cool a bit before opening. This will soften the squash making it easier to cut.   

Friday, March 15, 2013

Mussels in Coconut Lime Broth

        What an exciting week it was!  Just two days ago, I was one of the thousands who were glued to their televisions once the white smoke came out of Sistine Chapel.  Excited to witness another piece of history, I patiently waited for the new Pope to come out of the balcony from 2:05 -2:55 pm.  Guess what?  Nobody came out. 
 
         Since I have some chauffer duties to do, I rushed to the car and hurriedly picked up the children from school.  Deep inside, I'm hoping the Pope will not make his grand entrance during my 15 minute absence. When I saw the kids,  I even told them that the first one home will get a treat.  The little trick paid off.  They were in and out of the car in no time. 
 
        As I was closing the front door, I heard the kids screaming.  "Hurry Nanay, the new Pope  came out of the balcony!"  Just my luck!  I was 5 seconds late for the big reveal.  Bummer!!!
 
        Speaking of luck, this weekend is St. Patrick's Day.  Though we don't have any trace of Irish blood in our family (as far as I know),  we also like to celebrate the occasion by having "Green foods" with the traditional Beef, Potatoes and Cabbage. 
 
        One of our family's favorite Green foods is this Mussels in Coconut Lime Broth.  Though the kids are not big mussels eaters, they love soaking their steamed rice with the light, creamy broth.  That leaves me and my husband more mussels to enjoy with wine or beer. Yum!
 
         What I love the most about this simply dish aside from the taste, is its versatility.  Depending on how you serve it, this easy to prepare recipe is perfect for entertaining.  As a cocktail dish, arrange the mussels in a platter and use the broth as a sauce. Just like the one on the photo below.  A few pieces of mussels in a bowl with more broth and a piece of toast, you have a nice soup.  For an elegant looking main dish, serve it with steamed rice and vegetables.  
 
        Am I making you hungry?  Here's the recipe for this 30 minute wonder. 
 
        Time to enjoy Happy Hour!
 
- Roz
 

Ingredients:

2 Tbs. extra virgin olive oil
1 Tbs. minced garlic
1 small onion chopped
2 inch cube fresh ginger sliced into strips
2 cans 14 oz. coconut milk
1 cup water
3 lbs. mussels
2 Tbs. fish sauce
1/2 tsp. chili flakes (you can add more if you like)
1 1/2 tsp. ground black pepper
1/2 cup fresh cilantro chopped
1/3 cup fresh lime juice

1. Preheat a big Dutch over or pan. 
2. Sautee garlic, onions and ginger in olive oil for about 3-4 minutes.  Make sure you don't burn it.
3. Add the coconut milk, water, fish sauce and black pepper.  Bring to boil.
4. Once boiling, add the mussels and lower the heat.  Simmer until the shells open.  Do not over cook.
5. Stir in the cilantro, chili flakes and lime juice.  Turn off heat and serve.
 

Wednesday, January 23, 2013

Kid Friendly Chicken Curry

        It's nice to be blogging again.  Did you miss me? Awww... Anyway, I am so thankful that the flu virus had totally left our home and everything is back to normal.  I can't believe what a big relief it is to finally hear some or should I say too much noise from the children. 
 
         Since the appetite of the gang is back too, I've decided to make their favorite Chicken Curry. My husband adores Indian food but we rarely go to Indian restaurants because the dishes tend to be too spicy for the kids' palate. By cutting back on the heat, this kid friendly version will surely surprise any picky eater.  In fact, my children can feast on just the rice and sauce only.  Don't be afraid to make the whole batch.  The leftovers still tastes great (even better) after 2 days. 


Ingredients:
 
1 lbs chicken breasts (boneless, skinless and sliced thinly)
2 Tbs. olive oil
1 tsp garlic (minced)
1/2 cup chopped white onions
1 tsp tumeric
1 tsp curry powder
2 tsp garam masala
8 oz can coconut milk
12 oz can crushed tomatoes
2 in fresh ginger (cut into strips)
2 Tbs. sea salt
1/2 tsp ground black pepper
1/4 tsp of chili flakes (you can add more if you like)
a handful of fresh parsley chopped
 
1. In a big pan, heat olive oil and pan fry the chicken in batches. About 2 minutes on each side. Then transfer to a plate.  Set aside.
2. On the same pan, saute tumeric, curry powder and garam masala for about 4-5 minutes. Stir often so that the spices will not burn.
3. Add the onions, garlic and ginger. Cook until the onions become transluscent.
4. Pour the crushed tomatoes into the spice mixture. Stir and bring to a boil.
5. Once the sauce starts to boil, add the coconut milk and cooked chicken.  Make sure the chicken pieces are evenly coated with the sauce.
6. Season with salt and pepper.
7. Simmer for 20 to 25 minutes.  Stir every 10 minutes to prevent the sauce or chicken from sticking to the pan.
8. Turn off heat.  Sprinkle with chili flakes and chopped parsley. Serve hot on top of steamed rice.
 
Note:
      Since I serve this to small children, I only used chili flakes.  If you like this recipe to have some kick, add a tsp or more of cayenne pepper.  Taste before you add extra cayenne pepper.  It can be really spicy. 
 
Enjoy!
 
-Roz


Tuesday, October 23, 2012

Dairy Free Mango Ice Cream

       "No more Ice Cream?" This was one of the first questions my children asked when we found out that our family has to avoid dairy totally.  Since they already knew that regular baked goodies mostly have wheat and so is pizza, they were at least hoping to get to enjoy this well loved frozen treat.  
 
        When my husband heard the kids' inquiry, he wanted to immediately say "Yes, no more ice cream." That response would have been the easiest to do and to deal with but it's just not me.  One, I don't like my children feel deprived or outcasts because of our family's new lifestyle. Two, for the sake of my sanity, I want to avoid chaos among the siblings. The situation where the majority blames the one who has the special food requirements thus starting a "victim/bad guy" episode.  So what did I say instead? "Let's see if we can make one without dairy."
 
        One day, I just realized that I have been eating dairy free ice cream all along. Having spent my childhood in the Philippines, I am accustomed to see an ice cream man or Mamang Sorbetero as what we all call him at almost every street corner. Sorbetes or "dirty ice cream" (I really don't know how that later name came about. Maybe, it's called that way because this type of ice cream was considered street food. I have no clue), is tradionally, made with coconut milk, sugar and natural flavorings such as chocolate, coconut, cheese, ube and my favorite Mango. 

     Since I don't have any access to a real Sorbetero (as if he will share his secret recipe), I tried to recreate this delicious dessert using the most basic ingredients. The result was simply divine.  Armed with my ever reliable ice cream maker, I can now confidently say to my children, "Yes, you CAN have Ice Cream!"


Ingredients:
 
1 13 oz can coconut cream
1 1/2 cups mango puree
1 cup sugar
pinch of salt
 
 
1. In a medium bowl,  whisk together mango puree, sugar and salt until all the sugar is dissolved. 
2. While  mixing, slowly add the coconut cream. 
3. Once fully incorporated, transfer to a container, cover and refrigerate for at least 3 hours.
4. Follow your ice cream maker's instructions for churning time.
5. Enjoy!
 
Note:
       - If you have no ice cream maker on hand, you can improvise by placing the container of your ice cream mix (make sure the lid has a tight seal) inside a bigger vessel (at least double the size of the one that holds the ice cream). Fill the bigger container with ice and a tsp of salt, cover and shake/ roll for about 10 to 20 minutes. 
        - You can also just freeze the ice cream mix.  Results wouldn't be as creamy though.
 
 
      Do you have a favorite ice cream flavor that you would like me to make dairy free? Let me know.
 
-Roz


Related Posts Plugin for WordPress, Blogger...