Showing posts with label nut free. Show all posts

Wednesday, April 29, 2015

Easy Gluten Free Corn Dog Muffins

   Last week, while the kids and I were talking about the coming fair in our town, Child#2 and Child#3 both made a wish.  Both were hoping they could eat a corn dog just like their other siblings.  Yes, my eldest and youngest recently outgrew their allergies and both were to order corn dogs when we eat out.   

    As a food allergy mom, simple requests such this always pinch my heart. No matter how many years we've managed their food restrictions without any complains, hearing them long for something especially food makes me really uncomfortable. If I only knew how to make their allergies go away.  

     Then with some divine intervention, a packaged containing a GF Jules corn bread mix arrived in my house.  It was a prize I won in one of Vegetarian Momma's giveaway I entered in months ago. What a coincident right? 


     Since I haven't really tried making my own corn dogs on a stick, I asked the kids if they would be interested to try a Corn Dog in the shape of a muffin.  To my surprise, they were all excited with the idea.  They just reminded me of the two things that are important to them --- taste and the surprise in the middle.  

     Without any coercing, I gathered all my ingredients and said a quick prayer to make sure that the end result will turn out good.  After carefully preparing the batter and making sure I totally covered the kielbasa slices, I crossed my fingers while I waited for it to bake.  

   The final product as you can see below is beautiful. Though it's not as brown or yellow as most corn breads are, the muffins were very moist and delicious. Even if the sausage in the middle gave off some of its juices, it didn't make the inside soggy.  In fact, it made it more flavorful.  

     It was really a fun and yummy experiment. Thank you GF Jules and Vegetarian Momma for making it easier for this mom.  As you may have already known, the kids' smiles brought by these simple treats are indeed priceless. 

      Are you ready to give this recipe a try? Let me know how it went.  

- Roz  


Ingredients:

1 box GF Jules Gluten Free Corn Bread Mix
2 6 oz. containers So Delicious Coconut Yogurt (vanilla flavor)
1/2 cup So Delicious Coconut Milk (sweetened vanilla)
1/2 Harvestland Polish Pork Kielbasa
1 Tbs. flax meal
3 Tbs. lukewarm water

Optional toppings:
1/4 cup Daiya Cheddar style shreds
2 Tbs. Earth Balance Buttery Spread (soy free for us)


1. Fill a saute pan with 2 cups of water.  Add the kielbasa and bring the water to a boil. Then let it simmer for 10 minutes. Take off from heat and set aside.
2. While heating the kielbasa, preheat the oven to 400 F. Line about 15 muffin crevices with either silicone cups or paper liners.
3. In a small bowl, combine the flax meal and water to make a goo. Set aside for at least 5 minutes before using.
4. In a big bowl, with the help of a fork, whisk together the yogurt and flax goo until well incorporated.
5. Add the corn bread mix.
6. Slowly add the coconut milk. Mix well with a fork.  If the batter seems too thick add more coconut milk, 1 tablespoon at a time until the batter is smooth.
7. Fill the prepared muffin tins with the batter.  Make sure it each is just half full.
8. Cut the kielbasa into 1 inch thick circles.
9. Place one slice of kielbasa in the middle of each muffin.  Make sure that the meat is completely covered by the batter.
10. Bake in the oven for 20- 22 minutes
11. Remove from the oven and cool for a few minutes before serving.  The inside will be very hot.

Friday, February 27, 2015

Decadent Double Chocolate Muffins Gluten Free Vegan

      It's been a while since I posted a baked dessert recipe here on the blog. That doesn't mean though that I've stopped experimenting in the kitchen.  If you've been following me in Instagram, Facebook or Twitter,  (I hope you are.) I'm sure you are aware that I'm spoiling the kids too much by always giving them freshly baked goods.  Hey, it's part of my job as a mom right? 

      Among the pictures I posted on Instagram lately, this Decadent Double Chocolate Muffins got the most requests for me to share the recipe.  I guess describing it super moist and made with lentil flour generated some extra curiosity.  What do you think?  Does it sound intriguing? 

    Anyway, for the past few months, I've been testing several protein rich naturally gluten free flours such as lentil, chickpeas, mung bean and even tiger nuts.  Child #3 in particular needs extra protein. Aside from that, we're already big rice eaters so I want to produce treats that are not only yummy but healthier as well.   

     While I'm writing this post, I've been going back and forth whether I'll call it a muffin or a cupcake.  Unlike most muffins, these are very light, soft and spongy.  The texture close to an angel food cake.  Without icing though, I can't officially call these cupcakes.  Anyway, I just decided to call it muffins.  If ever you need to make cupcakes, you can make these and top it with some healthier Creamy Chocolate Frosting.  I'm sure it will be a hit to any party.  

         Who says you have to feel guilty when you eat something decadent?  Give these a try and let me know what you think.  

          Have a great weekend!

- Roz


Ingredients:

2 Tbs. ground flax seeds
6 Tbs. water
1/2 cup unsweetened applesauce
1 cup nondairy milk ( I used flax milk)
2 tsp. apple cider vinegar
1/4 cup avocado oil (or canola, grapeseed)
2 tsp. vanilla extract
1 cup organic raw sugar
1/2 cup chocolate chips

Flour mix
1/4 cup arrowroot flour
1/3 cup potato starch
1 cup lentil flour
1 Tbs. baking powder
1/2 tsp. baking soda
1/2 tsp. sea salt

1. Preheat oven to 375 degrees F.  Line two (12 standard sized) muffin tins with cupcake liners or silicone cups.
2. In a small bowl, combine the flax seed and water to make .  Mix well and let it stand for at least 5 minutes.
3. Add the apple cider vinegar to the non dairy milk. Stir and set aside.
4. In a medium size bowl, shift the ingredients of the flour mix.
5. With the mixer running, cream the sugar, avocado oil, apple sauce and flax seed goo until light and fluffy.
6. Alternately add the flour mix and non dairy milk.  Start and end with the flour mix.
7. Mix for about 1 minute.
8. Stir in half of the chocolate chips.
9. Fill prepared muffin tips up to 3/4 full.
10. Top with remaining chocolate chips.
11. Bake at 375 degrees for 10 minutes.
12. Reduce the oven temperature to 350 and bake for another 10-13 minutes or until the toothpick inserted in the middle comes out clean.
13. Remove from the muffin tins and let it cool on top of a cooling rack.
14. Enjoy!

Monday, January 5, 2015

Gluten Free Vegan Protein Rich Chocolate Chip Blondies

        Do you have a sweet tooth? I do!  In fact, I would gladly skip any meal just to have dessert.  

     Since I decided to make our family's meals and treats a lot healthier this new year, I'm now focused on creating recipes that are sneakily filled with good for you ingredients.  To get the ball rolling, I am sharing with you this very easy recipe for our favorite Chocolate Chip Blondies.  

        Unlike the traditional ones, these blondies don't contain any butter or shortening, eggs or even gluten.  The beans make it creamy and delectable.  Flax seeds not only binds it together, it also provides Omega 3's and fiber.  Speaking for fiber, have you heard of Tigernuts?  Tigernuts, contrary to its name is not a nut but a small root vegetable native to Africa.  It is the #1 source of Resistant Starch, a Prebiotic fiber that resists human digestion and becomes fuel for our bodies natural Probiotic bacteria.   The flour I used in this recipe is made with Tigernuts which has a sweet and nutty flavor. 

          Are the ingredients making you scared?  Don't be!  These have been used by people outside the US for ages.  Plus the end result is surprisingly divine.  Just ask my four tough critics.  The best part is that, I don't have to be guilty about having a piece or two.  Oh, and these are also great for the kids' lunch box dessert.  

            Ready to try something new?  Then give these blondies are try.  Don't forget to let me know how it turned out too. 

             Have a great week!

- Roz


Ingredients:

1 15 oz can cannellini beans, rinsed well
1 cup organic raw cane sugar
1 tsp. vanilla extract
2 Tbs. flax meal (ground flax seed)
6 Tbs. lukewarm water
1/4 cup avocado oil
1/2 tsp. baking powder
1/2 tsp. Himalayan Pink Sea Salt (coarse ground)
1 tsp. ground nutmeg
1 cup Organic Gemini TigerNut Flour
3/4 cup chocolate chips (I used Enjoy Life Dark Chocolate Morsels  )

1. Preheat oven to 350 degrees.
2. Line a 9x9 inch pan with parchment paper.
3. Make a flax goo by combining water and flax meal. Set aside for at least 5 minutes before using.
4. In a blender or food processor, add the beans, sugar, vanilla, flour, baking powder, oil, nutmeg and flax goo.  Blend or process until smooth.
5. Transfer the mixture to the prepared pan.  Top with chocolate chips.
6. Bake for 35-40 minutes or until a toothpick inserted in the middle comes out clean.
7. Remove from the oven and sprinkle the sea salt on top.
8. Let the blondies cool in the pan before slicing.
9. Enjoy!

(Note:  This post contains affiliate links for the ingredients I used in this recipe. Please see my full disclosure here.)

Monday, July 14, 2014

Deal Alert: Food Allergy Friendly Desserts at ACME Superstore

 Last night, instead of going to an ice cream shop for dessert, I headed to the local Acme Superstore.  There are some great deals which I can't help but share.  

      Just a quick note, most sales on Acme run Friday to Thursday.  This deal will be available until July 17, 2014.

      Time to stock up. 

-Roz


     Philly Swirl Cups with Candy (6 cups a box) - $3.99 regular price
     On Sale for $2.99 
     Used $1.00 Coupon (from Sunday paper last month)
     Final price : $1.99/box


     Luigi's Italian Ice (6 cups a box) - $4.99 regular price
     On Sale for $1.99 
     Used  $1.00 for 2 Coupon (this Sunday's paper)   
               $0.50 Coupon (from a previous box)
               $0.50 Store match coupon discount
     Final price : $3.97 for 3 boxes


     Enjoy Life Chocolate Bars - $1.99/pc. regular price
     On Sale for $1.79 

     Goldbaums Gluten Free Ice Cream Cones - $4.99/box (12 pcs.)
     On Sale for $3.79

Friday, June 13, 2014

Protein Packed Gluten Free Coconut Chocolate Chip Cookies

      Do you like cookies? My children do! In fact, if they could get away with it, each will finish a dozen in one sitting.  That's about 48 pieces for a quick snack.  I know what you're thinking. Junk food!

     Since their food allergies don't allow them to have the regular cookies anymore and the FA friendly ones are quite pricey (to my relief!), I decided to start tinkering in the kitchen to make something as close as possible to the "real" cookies but healthier.  Inspired by the Fudgy Black Bean Brownies which the kids can't have enough,  I was able to nail one easy to make recipe. Guess what? I'm sharing it to you today.

      If you notice that the recipe requires one whole can of cannellini beans, don't freak out and run. That is the secret why I called these cookies "Protein packed" in the first place. You can keep a secret right?

       Still hesitant?  Trust me, the end product is so worth it.  The cookies are soft, chewy and melt in your mouth delectable.  With chocolate, vanilla and coconut combined, what can possible go wrong? Plus, you can let the blender or food processor do the hard work for you.

      Most importantly, these cookies will not make you feel guilty when you grab one or two or even three.  So, are ready to try them out?  Let me know how they turn out.

     Have a fantastic weekend!

- Roz


Ingredients:

1 15 oz can cannellini beans (rinsed and drained)
2/3 cup sugar (preferably raw or organic)
1/3 cup pea butter (you can also use sun butter, peanut, almond or cashew butter)
1/3 cup coconut flour
2 Tbs. sweet rice flour (optional)
1 tsp. baking powder
1 tsp. vanilla extract
1 Tbs. sugar
1/3 cup coconut milk
1 cup semi-sweet chocolate chips (I use Enjoy Life)

1. Preheat oven to 375 degrees. Line 2 cookie sheets with parchment paper or silpat.
2. In a blender or food processor, puree the beans, 2/3 cup sugar, pea butter, coconut flour, rice flour, baking powder, vanilla extract and coconut milk.  Make sure the mixture is well blended and smooth.
3. Stir in 1/2 cup of chocolate chips.
4. Using a 2 Tbs. ice cream scoop or 2 spoons, make 12 round equally size mounds on a prepared cookie sheet.
5. Dip a fork in the remaining 2 Tbs. of sugar and use it to flatten the cookies to about 2 inch circles.
6. Decorate the cookies with the leftover chocolate chips.
7. Bake for 18 minutes or until the edges are golden brown.
8. Remove from the oven and carefully transfer to a wire rack to cool.
9. Serve immediately.
10. Place leftovers in an air tight container for up to 3 days.

Thursday, April 24, 2014

Food Allergy Friendly Snack: Chow Chow Recipe

       Have you ever been in this scenario?  Your children have begged you for days or weeks to buy  a certain brand of cereal.  Then when you finally gave in and bought a box or two, each would excitedly eat about a cup.  After that initial tasting, the coveted product will find its way in the cupboard where it will join the rest of  the half finished containers of cereals.   

      I confess,  no matter how I try to be strict about this issue,  I always end up with a collection of cereal containers.  Though many would tell me, if nobody wants to eat it, just get rid of it.  The frugal in me often prevails.  How can I possible throw away food especially if I know that it is still good? Don't forget too that we are buying food allergy friendly and organic as possible.  So, those are prime commodities baby! 

       Before the food allergies, whenever I have the urge to clean the pantry,  I often crush those unwanted cereal into tiny pieces.  Depending on the kind, I add some to cookie batters, use it as muffin toppings and even crust chicken tenders with it. Since I started buying the more expensive types of cereal, I realized that I don't even have the courage to break those crunchy stuff into smaller pieces.  

       One day, while trying to bribe my Child #1 to eat some of these "forgotten" cereals, she asked me why I'm not making Chow Chow anymore.   It was one of her favorite snacks when she was younger. Also, the primary reason that kept her eczema from popping all over her body though.  

    Since I'm more confident now in making traditional recipes, allergy friendly, I immediately looked for my treasured recipe binder.  I know for a fact that the recipe isn't complicated.  Plus, I'm sure I have my reliable and tested product substitutes on hand.  Then the experiment began.

      To my surprise, the first try was a huge success.  Everybody not only gave the new Chow Chow recipe two but four thumbs up each.  Can you guess where they got the other two thumbs?  Anyway, this treat has become a staple in our monthly menu.  The new challenge for me is to make a batch last for at least 3 days.  

      How about you?  What do you usually do with those half eaten open bags of cereal?  Do you have any interesting recipes you would like to share?  I love to hear from you.  

- Roz


Ingredients:

     9 cups cereal (gluten free of course!)
     1 cup semi sweet chocolate morsels (I used Enjoy Life Foods Mini Chocolate Chips)
     1/2 cup Peanut free butter (I use No Nuts Golden Peabutter )
     1/4 cup non dairy butter substitute
     2 1/2 cups powdered sugar
     1 tsp. vanilla extract


1. Put the powdered sugar in a gallon size ziploc bag.  Set aside.
2. In the big microwavable bowl, combine chocolate, peanut butter substitute, non dairy butter and vanilla.
3. Heat the bowl in the microwave just until the chocolate chips are melted.  It usually takes about 40 seconds on high.
4.  Mix until well combined.
5.  Add the cereal and mix until the everything is coated with the chocolate mixture.
6. Immediately put the cereal mix in the bag with the powdered sugar.  Close and shake until the cereal is coated.
7. Pour the mixture on a flat tray and let it cool.
8. Transfer into containers with lid and store in the refrigerator.
9. Serve cold or at room temperature.

( I am a member of Amazon's affiliate program and the links I've included in this post will direct you to that site.)

Tuesday, April 15, 2014

Gluten Free and Vegan Cranberry Oat Muffins

       It's the first day of Spring break in our home.  Do you know what that means? There will be non stop cooking, baking and entertainment for the kids.  Are we having a party?  Not really.  It just so happens that when my school age children have no school, all the food seem to fly off the pantry and fridge.  Have you experienced that too?

        Anyway, I realized that it has been a while since I posted a recipe.  So today, I'm sharing with you one of the family's new favorite snack and weekend breakfast treat.  These easy to make muffins are very light, it can pass as a delicious cupcake base.  It's also filled with healthy dried cranberries (kids' new fruit to try) which give that sweet and tangy flavor we all love.

        If you are looking for something new to serve for Easter brunch or just a healthier lunch box treat, I suggest you give this one a try. Even those who aren't vegan or in a gluten filled diet will never know the difference.  As my kids' say "It's 4 thumbs up!"

       Have a great week my friends.


- Roz


Ingredients:

1 cup oat flour
1/2 cup rice flour
1/3 cup potato starch
1/4 cup tapioca starch
1 Tbs. baking powder
1/2 tsp. baking soda
1/4 cup avocado oil (you can also use canola, coconut or sunflower oil)
2/3 cup raw organic sugar
2 Tbs. flax meal
6 Tbs. lukewarm water
1 cup unsweetened applesauce
1 tsp vanilla extract
2/3 cup dried cranberries

1. Combine the flax meal and water in a small bowl to make a flax goo.  Set aside for at least 5 minutes before using.
2. Preheat the oven to 350 F.  Line muffin tins with paper baking cups.  This recipe makes about 16 - 18 standard sized muffins.
3.In a bowl, whisk all the dry ingredients (flours, starches, salt, baking powder, baking soda and salt).
4. In another bowl, with the help of a stand up or handheld mixer, cream the oil, sugar, flax goo, applesauce and vanilla extract.  This takes about a 1-2 minutes.
5. Withe the mixer running, slowly add the flour mixture.  Mix until the flour is well incorporated and there are no lumps.
6. Stir in 1/3 cup of dried cranberries.
7. Fill the muffin tins 2/3's full with the batter.  Top with dried remaining cranberries.
8. Bake for 20-25 minutes or until a toothpick inserted in the middle of a muffin comes out clean.
9. Serve warm or at room temperature. Top with powdered sugar before serving.

Tip: If you can have white chocolate, melt some in the microwave and drizzle on top of the muffins before serving.

Wednesday, November 6, 2013

Can't Get Enough Pumpkin Oat Muffins

      Ah, it's that time of the year again.  Orange is definitely the new black!  Okay people I'm not referring to the show.  In fact, I've never seen it at all even though we have a Netflix subscription.

       What I'm talking about here is the wonderful vegetable called pumpkin.  From coffee to soups to decorations, this fall must have is definitely all over the place. I don't know about your kids but in our home, pumpkin has taken over the top spot from chocolate.  Is that even possible? Looks like it.
   
      With so many asking for pumpkin recipes, I decided to share with you my secret Pumpkin Oat muffin recipe.  (I hope you all can keep a secret.) You will notice that it only requires one cup of pumpkin puree. I know what you're thinking.  What to do with the leftover puree?  Don't worry I assure you, one batch or even two will enough for everyone. My kids are devouring it like crazy.  I barely can keep up with the baking!

         Guess what?  Even my kids' friends who don't have food allergies love it. Give this gluten free, vegan treat a try this holiday season.  I'm sure your non food allergy friends and family will enjoy it too.


- Roz


Ingredients:

1 cup oat flour (I make my own using Bob's Red Mill Gluten Free Oats)
1/2 cup rice flour
1/3 cup potato starch
1/4 cup tapioca starch
1 Tbs. baking powder
1/2 tsp. baking soda
1/4 tsp. sea salt (finely ground)
1 tsp. cinnamon powder
1/4 cup oil (I used Organic Virgin Coconut Oil )
2 Tbs. flax meal
6 Tbs. lukewarm water
1 cup sugar (I used Organic Coconut Sugar )
1 cup pumpkin puree
1/2 cup non dairy milk (I used flax milk.  You can also use coconut or rice milk)
1/2 tsp. apple cider vinegar

1. Preheat oven to 350 F.  Line standard muffin tins with paper liners or grease with oil.
2. Prepare flax goo by combining the flax meal and water.  Set it aside for at least 5 minutes before using.
3. In a small bowl, make "buttermilk" by adding the vinegar to the non dairy milk. Mix and set aside.
4. Except for the sugar, whisk all the dry ingredients. 
5. With the mixer running, cream the oil and sugar.
6. Add the flax good and pumpkin puree.  Mix well.
7. In 3 batches, alternately add the dry ingredients and non dairy "buttermilk" to the pumpkin mix.
8. Scoop into prepared muffin pan.  Make sure each cavity is only 2/3 full.
9. Bake for 30-35 minutes. Use the toothpick test --- the toothpick comes out clean.
10. Let it cool in the muffin tins for 3 minutes before transferring to a cooling wire rack.
11. Top with powdered sugar for a festive look.

Makes about 18 standard sized muffins.

Thursday, October 3, 2013

Gluten Free Vegan Carrot Cake Mini Donuts

          Ah Donuts! I can't believe how obsessed I have become after purchasing that cute Babycakes Mini Doughnut Maker which my children saw on sale about a year ago.  I can still clearly remember that day.  It was a few weeks after Child #3 was diagnosed with food allergies and our home has to be clear of wheat, dairy, egg, soy, nuts and peanuts.  While grocery shopping, the kiddos gang up on me and sweetly justified why we need another kitchen gadget.
 
           Since I haven't made any doughnuts before, I'm a bit hesitant.  Their positivity, however,  about being able to eat their favorite treat again, made me gave in.   Boy! I'm so glad I listened to them.
 
            Maybe you're wondering why I am so passionate with donuts all of a sudden. Here are the top five reasons.
              1. The mini donuts are portioned and portable.  I can always throw some in the lunch box.
              2. Making my own donuts allows me to add healthier ingredients.  Sneaky way of giving more fruits and vegetables to the kids.
              3. It's baked which means less oil and calories.
              4. Since I make them food allergy friendly, my children don't feel left out or very restricted.
              5. The kiddos just love them! 

           When I was young, I am not a huge fan of carrots.  Everything changed when I had my first slice of the carrot cake from a newly opened bakery near our home.  If something made from carrots can taste as heavenly as that, then vegetables aren't that bad at all.   
 
             This recipe was reminiscent of that feeling.  These doughnuts which are loaded with carrots are a delectable treat without the big guilt.  I often leave it unfrosted to avoid extra sugar and make it school snack friendly.  Dusting it with confectioner's sugar at the end, makes it a pretty dessert too.
 
              Are you craving now?  Me too.  I think it's time to make another batch just for me. Want to give this a try? What are you waiting for?  If you need any help, just let me know.
 
- Roz


Ingredients:

2 Tbs. flax meal
6 Tbs. lukewarm water
3/4 cup sugar (I used Wholesome Organic Sugar )
1/3 cup coconut oil
1 tsp. molasses (you can also use maple syrup)
1 cup rice flour
1/2 cup oat flour
1/4 cup potato starch
1/4 cup tapioca starch
1 Tbs. baking powder
1 tsp. baking soda
1/4 tsp. salt
2 tsp. cinnamon powder
1 tsp. nutmeg
1/2 tsp. Chinese 5 spice powder
1 1/2 cup finely grated carrots
1/4 cup powdered sugar (optional) This will is just for dusting after the donuts are done.

1. Preheat an electric donut maker. 
2. In a small bowl, combine the flax meal and water to make a flax goo.  Set aside for at least 5 minutes before using.
2. Whisk together all the dry ingredients.  Set aside.
3. With the help of an electric mixer, cream the oil and sugar until it is light in color. 
4. Add the flax goo and molasses.
5. Slowly add the flour mixture until just combined. Don't over mix.
6. Fold in the carrots. 
7. Drop about 2 Tbs. of the batter on the donut maker crevices.  Bake for 7-8 minutes.
8. Sprinkle some powdered sugar on top.

Wednesday, August 28, 2013

Almost Perfect Domino's Gluten Free Pizza Review

      As a mom of four kids between the ages of 4 and 10, I am very much familiar with the importance of pizza.  I don't know what's in this dough, sauce and cheese combo that makes children and even grown ups get excited.  Okay, I confess I love the thin crust, meat loaded one.  In fact, it was my biggest craving while pregnant with my eldest. 
 
       Anyway, when we got the news that we must remove food with gluten, egg, dairy, soy etc. in our home because of Child #3's very high risk for anaphylaxis, the one thing that got the kids really worried is the fact that they may not able to eat a slice of pizza ever again.  Though I was able to make a safe pizza for them, I still went on and looked around for pizza places that might offer something that will be appropriate for their food requirement.  A task quite challenging even though we live in a place surrounded with family owned pizzeria in every corner.
 
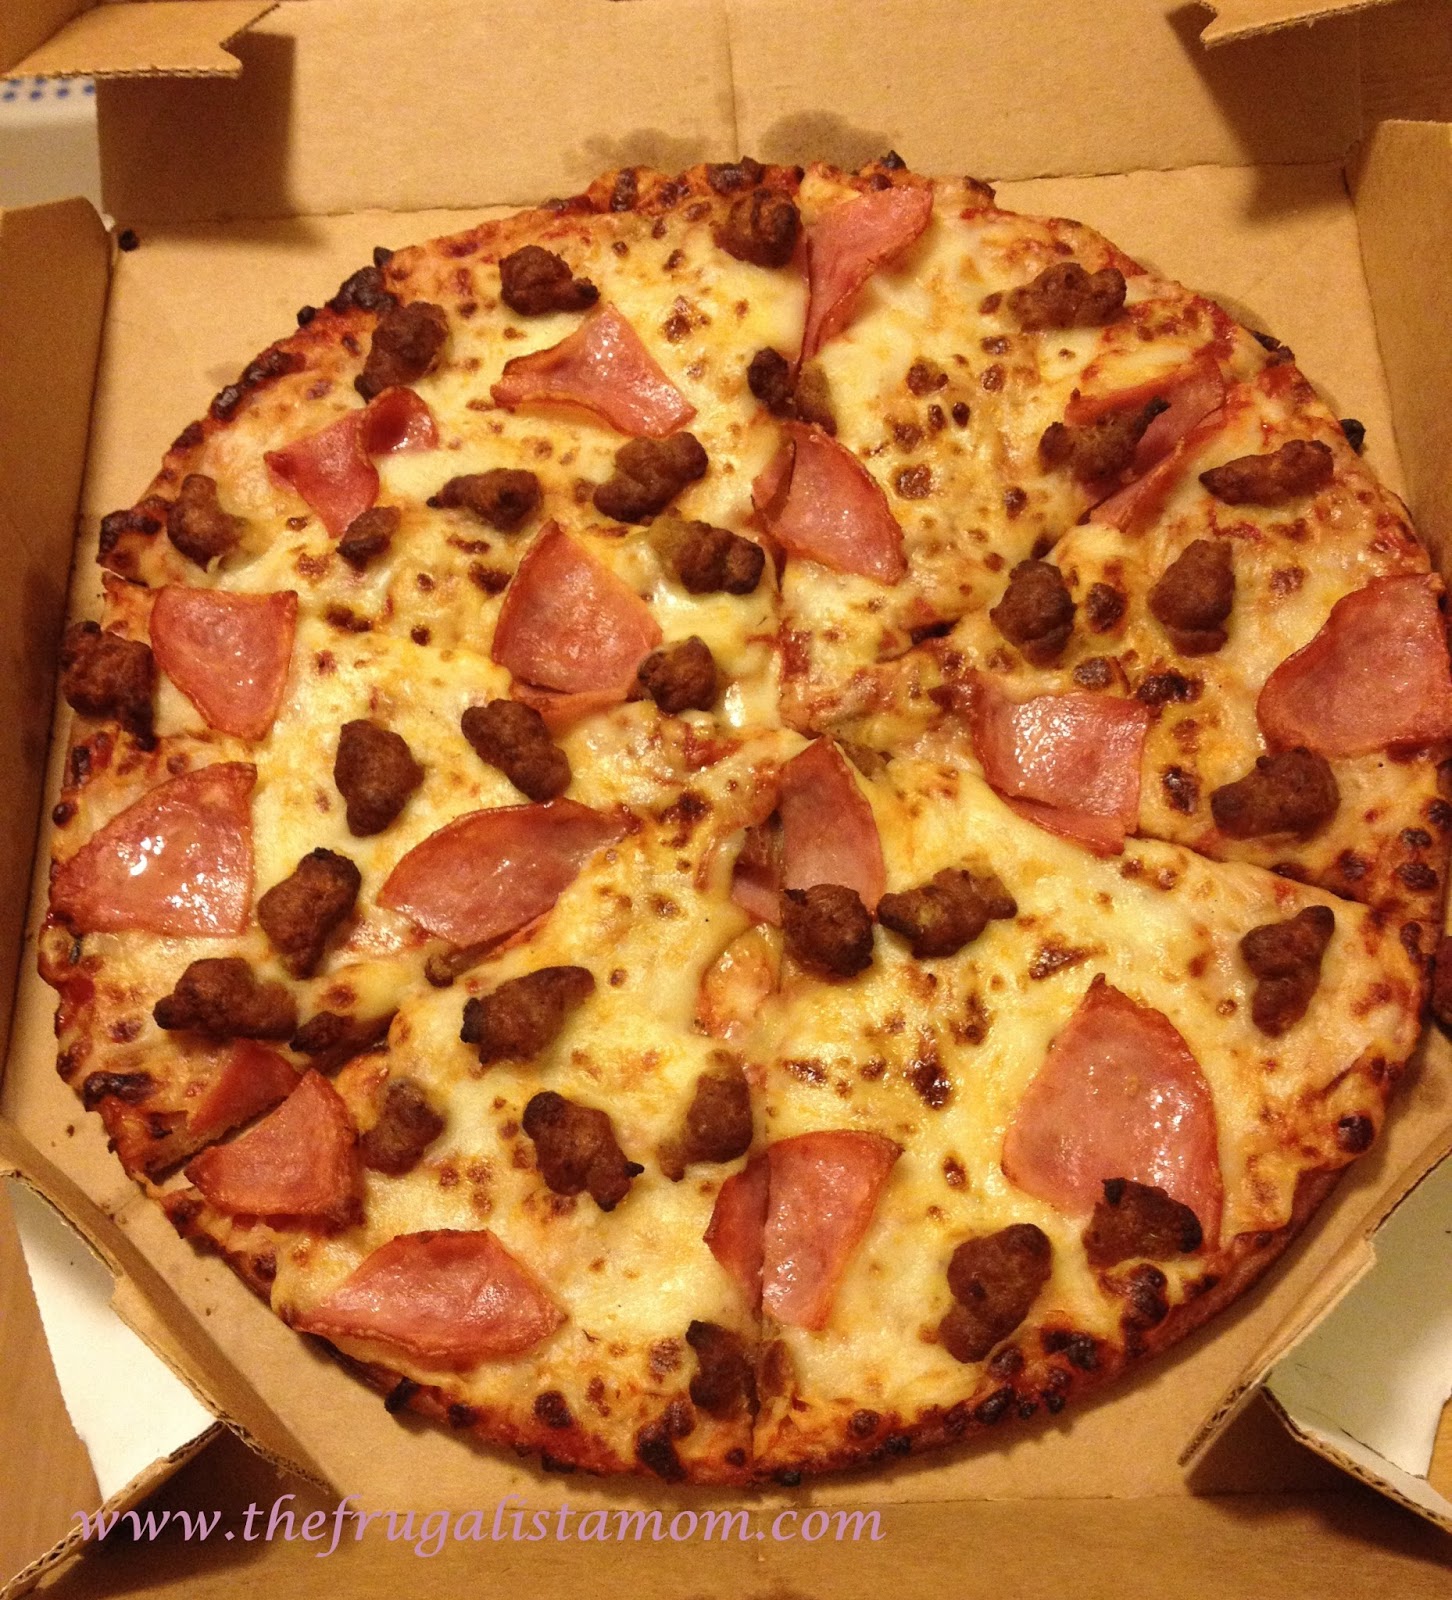
       Then low and behold, I accidentally found out online that the national chain Dominos started to offer a gluten free pizza crust.  After carefully examining the ingredients for the sauce and toppings, I was able to get an almost perfect food allergy friendly pizza treat.  I ordered a pie with a Gluten free pizza crust, Domino's original sauce, topped with Ham and Sausage. 

       Just a quick note.  Domino's has a disclaimer that their facilities/stores are not completely gluten free. Though they try to provide gluten free options, there is still a risk of cross contamination.  I like that they are completely honest about it.  That's why I relied on the consideration of the branch where I ordered my pie.  So far, the one that is closest to our place, was very accommodating and took extra care and caution.  


       When the pizza arrive, I'm a bit disappointed with the size.  I know it mentioned 10 inch pie but it didn't say it will be thin crust!  We have 6 testers remember?  Anyway, I was surprised that the pizza tasted like a normal pizza.  The crust in particular is quite good. It has a bread like texture and the sides are crunchy.  It is very similar to that of a regular thin crust. There is also no after taste that is common among gluten free products. 

       My children who can have dairy, really enjoyed the pizza and gave it a thumbs up.  Child #3 who has a milk allergy but can tolerate small amounts of cheese ate a slice too.  His smile while eating was priceless.  Though he didn't show any reactions after eating, I am not pushing my luck.  After all he is the high risk one. 

       If only Domino's can extend the effort and offer a dairy free cheese option.  Their Gluten Free Pizza, allergy friendly pizza could have been perfect. Oh well, there's no harm in hoping.  Who knows? Maybe in the next year or so.  In the mean time, 2 out of my 4 can have a safe take out pizza.  That makes me a happy mommy. 

- Roz       


Tuesday, August 20, 2013

Vodka Braised Beef with Baby Bella Mushrooms

        With the air slowly starts to cool down and the leaves changing their colors, it is time to bring out my arsenal of stews and crockpot recipes.  Who wouldn't want to come home with a hot dinner waiting right?  Not to mention, the crazy chaos brought by hungry kids from school.      
 
        During my catering days so many years ago, one of the most requested dishes in the menu is this Vodka Braised Beef with Baby Bella Mushrooms.  Sounds complicated? Not really.  In fact, this complex flavored stew can also be prepared ahead of time and cooked with the help of that friendly slow cooker. 
 
         For those of you who are also gluten free and are worried about using vodka, there are now some brands that make vodka from potatoes, corn and even grapes.  Check out this list for suggested brands.   If you have concerns about serving food with alcoholic ingredients (even cooked) to your kids, feel free to substitute beef stock for both water and vodka.  The end product will be slightly different in flavor but still a crowd pleaser. 
 
         Okay my foodie friends, my secret recipe is out.  Feel free to share the love and the food. Just don't forget to let them know that you got it from me.  :)
 
          Happy Cooking.
 
- Roz


Ingredients:

3 lbs. beef chunks (cut in 2 inch cubes)
2 Tbs. olive oil
1 Tbs. sea salt
1 tsp. garlic powder
1 tsp. ground black pepper
1 Tbs. minced fresh garlic
1/3 cup chopped celery
2 Tbs. tomato paste
1/2 cup Vodka (check for the Gluten Free varieties)
3 1/2 cup water
3 pcs. bay leaf
2 pcs. star anise pods
1 cup sliced baby Bella mushrooms
1 Tbs. chopped fresh parsley

1. In a small bowl, combine the salt, garlic and black pepper to make a seasoning mix.  Set aside 1 1/2 tsp.
2. Rub the beef chunks with the remaining seasoning mix.
3. In a heavy pot with olive oil, brown the beef in batches. You don't have to cook it all the way thru.  Just make sure you have a nice sear.
4. Using the same oil, sauté the garlic and celery until fragrant. About 2 - 3 minutes.
5. Add the tomato paste and cook for another 3 minutes.  Make sure to keep on stirring to avoid burning.
6. Pour the vodka and let the alcohol evaporate for about 6 minutes. 
7. Return the seared beef in the pot and add the remaining seasoning mix, star anise, bay leaf and water.  Bring to boil.
8. Once it starts boiling, lower the heat and simmer for 2 hours or until meat is tender.  Stir every 30 minutes to prevent the sauce from sticking into the pan.
9. When the meat is tender, add the mushrooms and parsley.  Mix.
10. Turn off heat and let it stand for 7- 10 minutes before serving. 

      For the slow cooker version, after the alcohol has evaporated, transfer the sautéed garlic and celery in the crock pot.  Then add the meat, water, star anise, bay. mushrooms and water.  Cook on high for 6 hours.  Stir in the parsley just before serving.


Monday, August 5, 2013

Vegan Double Chocolate Chip Mini Donuts - Gluten Free

         One of the biggest challenges I experience as a food allergy mom is letting my young children eat baked goods. As you may have already know, we are wheat, dairy, egg, soy, nut and peanut free.  Wait! Did I just write the basic ingredients for baking and told you that we can't have any? 
 
         Since I don't like my kids to feel left out especially when they are invited to birthday parties, I decided to devote a big deal of my time creating recipes that will satisfy that sweet craving.  One of my favorites, if you haven't notice by now are mini donuts.  I like these little treats because kids find it fancy. Grown ups like it for portion control. (Yeah right?)  For me, it's a matter of  portability.  I even started bringing these to family gatherings and luckily, they are well accepted.
 
         Two weeks ago, I brought these double chocolate chip donuts to my niece's birthday party.  These light and flavorful little desserts became an instant hit.  The non gluten free eaters didn't even care what's in it.  All they say is that it's really good as they keep on popping one after another. 
 
         Who says those who have food restrictions eat boring and tasteless food? 
 
- Roz 


Ingredients:
 
1/2 cup cocoa powder
3/4 cup oat flour (you can also use sorghum flour)
1/4 cup rice flour
1/4 cup potato starch
1 Tbs. baking powder
1/2 cup raw cane sugar (I use organic)
1 Tbs. flax meal
3 Tbs. lukewarm water
3/4 cup flax milk (any non dairy milk substitute, rice, almond, hemp)
2 tsp. rice vinegar (you can also use apple cider vinegar)
1/4 cup coconut oil (you can also use sunflower or canola oil)
1 tsp. vanilla extract
1/2 cup mini chocolate chips (I used Enjoy life)
 
1. Make flax goo but combining the flax meal and water in a small bowl.  Set aside for at least 5 minutes before using.
2. Preheat your electric donut maker. 
3. In a big bowl, whisk together the cocoa powder, oat flour, rice flour, potato starch and baking powder until well blended. Set aside.
4. Make "buttermilk" but adding the vinegar to the non dairy milk.  Let it stand for 3 minutes.  Don't worry if it starts to curdle a bit.
5. In another big bowl, cream the oil, sugar and flax goo.  Use can use either a stand mixer or handheld electric mixer for this. If you don't have either, you can just whisk it by hand until it is well blended and light in color.
6. While mixer is running on low, alternately add the flour mixture and non dairy buttermilk to the oil and sugar mix. Start and end with the dry ingredients. 
7. Fold in the chocolate chips.  Make sure you don't over mix the batter. 
8. Let the batter stand for 5-8 minutes.
9. Pour about 2 tablespoons of the batter on each donut cavity.  Top with a few pieces of chocolate chips.
10. Bake for 6-7 minutes. 
11. Transfer on a wire rack to cool before serving.
 

Monday, July 29, 2013

Surprisingly Good and Healthy Gluten Free Vegan Chocolate Chip Cookies

          Do you have a foodie buddy? You know that friend who always enjoys talking about food, eating and even shares recipes with you.  I do!  In fact my list of food loving friends exponentially grew when I started my food allergy journey.  If you don't have at least one yet, don't worry, yours truly is always here.  Also, you are most welcome to join me and the gang on Facebook thru the page Allergy Friendly Home.   
 
            One of my favorite foodie buddies is Fit Chef Trina of Fit Chef for Life. I have known this wonderful person for years.  We were college block mates to be exact.  Okay people, I'm not revealing any age here so don't ask how long that has been.  Anyway,  Trina is a living testimony that one doesn't have to sacrifice good food to be able to be healthy.  Check out her amazing story and I'm pretty sure you will be inspired too.
 
            When I first learned about the restrictions in my children's diet, Fit Chef Trina was one of the firsts who came to my rescue.  She gave me ideas on what other food I can use as substitute for dairy and eggs.  She even shared her easy to prepare gluten free dishes.  Most importantly, she empowered me to tackle this cooking for food allergies challenge in a very positive manner.
 
          
           Earlier this month, she surprised me with a recipe for a healthier gluten and egg free Chocolate Chip Cookies.  My children were so excited when I showed them the picture.  With just some minor substitutions, we were able to make the cookies and the response was priceless.  We are even making another batch right after I finish this post. 
 
        I love that I can make these cookies right in the food processor.  That means less things to clean up for me.  The original recipe calls for Almond Butter and Almond Milk.  Since we are nut free at home, I used Vanilla flavored Flax Milk and No Nuts Pea Butter.   Also, instead of the sweeteners mentioned, I made the cookies with what I have on hand which is Organic raw cane sugar (about 2/3 cup).  I also used Enjoy Life Mini Chocolate Chips in place of the Ghirardelli ones.
            To make the cookies even in size, I used a small ice cream scoop that holds about two tablespoons of batter.  Then I dipped a fork in some sugar to flatten it before putting the chocolate chips on top.  I was able to get a total of 24 cookies from the recipe.
 
             I urge you to give this recipe a try. You, your mom, friends and even children will surely love these delicious treat.  Not to mention, your body will love you back too.
 
           Enjoy your week Frugalista Foodies!
 
- Roz      


Monday, July 15, 2013

Snickerdoodle Mini Donuts - Vegan, Gluten and Soy Free too

       Last Saturday, my girls celebrated their birthdays with a joint pool party.  It was their first time to have a party after the food allergy diagnosis.  I tried to make it as simple as possible by ordering Gluten free Dominos Pizza for my kiddos and regular pizza for guests.  Sneaky right? Then I made Double Chocolate S'mores Cupcakes (Sorry everything just flew like crazy before I got to take some pictures.), allergy safe chips, limeade and these Snickerdoodle Mini Donuts. 


         I always love to entertain.  Not only for the company but to test my recipes.  I'm lucky I have awesome people who are willing to try anything that comes out of my kitchen.  Anyway, I'm a little nervous this time because the young guests ages 8 - 10 aren't familiar or have never even tried any gluten free and vegan baked good.  Knowing them, it is a matter of either they eat or doesn't touch the food at all. 
 
         To my surprise, these donuts were a big hit.  I brought 4 dozen (2 batches of this recipe) for the 15 guests including a couple of moms.  Everyone enjoyed it and were even asking for more.  The moms couldn't believe that the donuts are indeed vegan and gluten, nut, peanut, soy free.   With so much rave, I'm not confident to share with your the recipe. 
 
         Without further intro, here's the recipe you have been waiting for. Warning! These are highly addictive so count as you pop.  :)
 
- Roz


Ingredients:

1/4 cup potato starch
1/4 cup tapioca starch
1/4 cup sorghum flour
3/4 cup rice flour
1 Tbs. baking powder
2 tsp. cinnamon powder
1/2 tsp. sea salt (finely ground)
2/3 cup organic cane sugar (regular white sugar will also work)
1/4 cup coconut oil (sunflower oil will also do)
1/2 cup flax milk (rice, almond or refrigerated coconut milk)
1 Tbs. flax meal
3 Tbs. lukewarm water
2 tsp. vanilla extract
1/4 cup unsweetened apple sauce

Topping:
1 Tbs. cane sugar (Turbinado sugar has bigger grains for more texture)
1/2 tsp. cinnamon powder

1. Preheat your mini donut maker.
2. Make a flax goo by combining flax meal and water in a small bowl.  Set aside for at least 5 minutes before using.
3. In a big bowl, whisk the potato and tapioca starch, rice flour, sorghum flour, baking powder, cinnamon and salt.
4. With an electric mixer or hand mixer, cream the oil, sugar, apple sauce and flax goo.
5. Once it's well incorporated, add the milk and vanilla.
6. Turn the mixer on low and slowly add the dry ingredients. 
7. Pour about 2 tablespoons of the batter in the donut crevices. 
8. Bake for 5-6 minutes.
9. Combine the sugar and cinnamon topping.
10. Once the donuts are done, immediately dip in the cinnamon sugar mixture.  If most topping does not stick, let the donuts cool for about 2 minutes and lightly brush with non dairy milk before dipping in the topping mixture.
11. Enjoy!      


Sunday, July 14, 2013

Friday Finds: Jamba Juice Smoothies

       Summer is in full swing.  That means nothing can beat a nice ice cold sweetened treat on a hot sunny day.  Since most of us are spending more time outdoors, a quite a challenging task for us with food allergies and special food requirements,  I decided to search ahead of time online for ice cream shops and frozen yogurt places which carry dairy free and healthier versions of cold treats.

       Lucky me, last month, I was contacted by the people of Moms Meet Program of May Media Group, LLC to review two products from their sponsor, Jamba Juice. Take note,  as a Mom's Meet blogger, I have received the smoothies for free in return for posting a review of it.  All the opinions I'm posting are my own and I call everything as it is.  No special treatments.

 
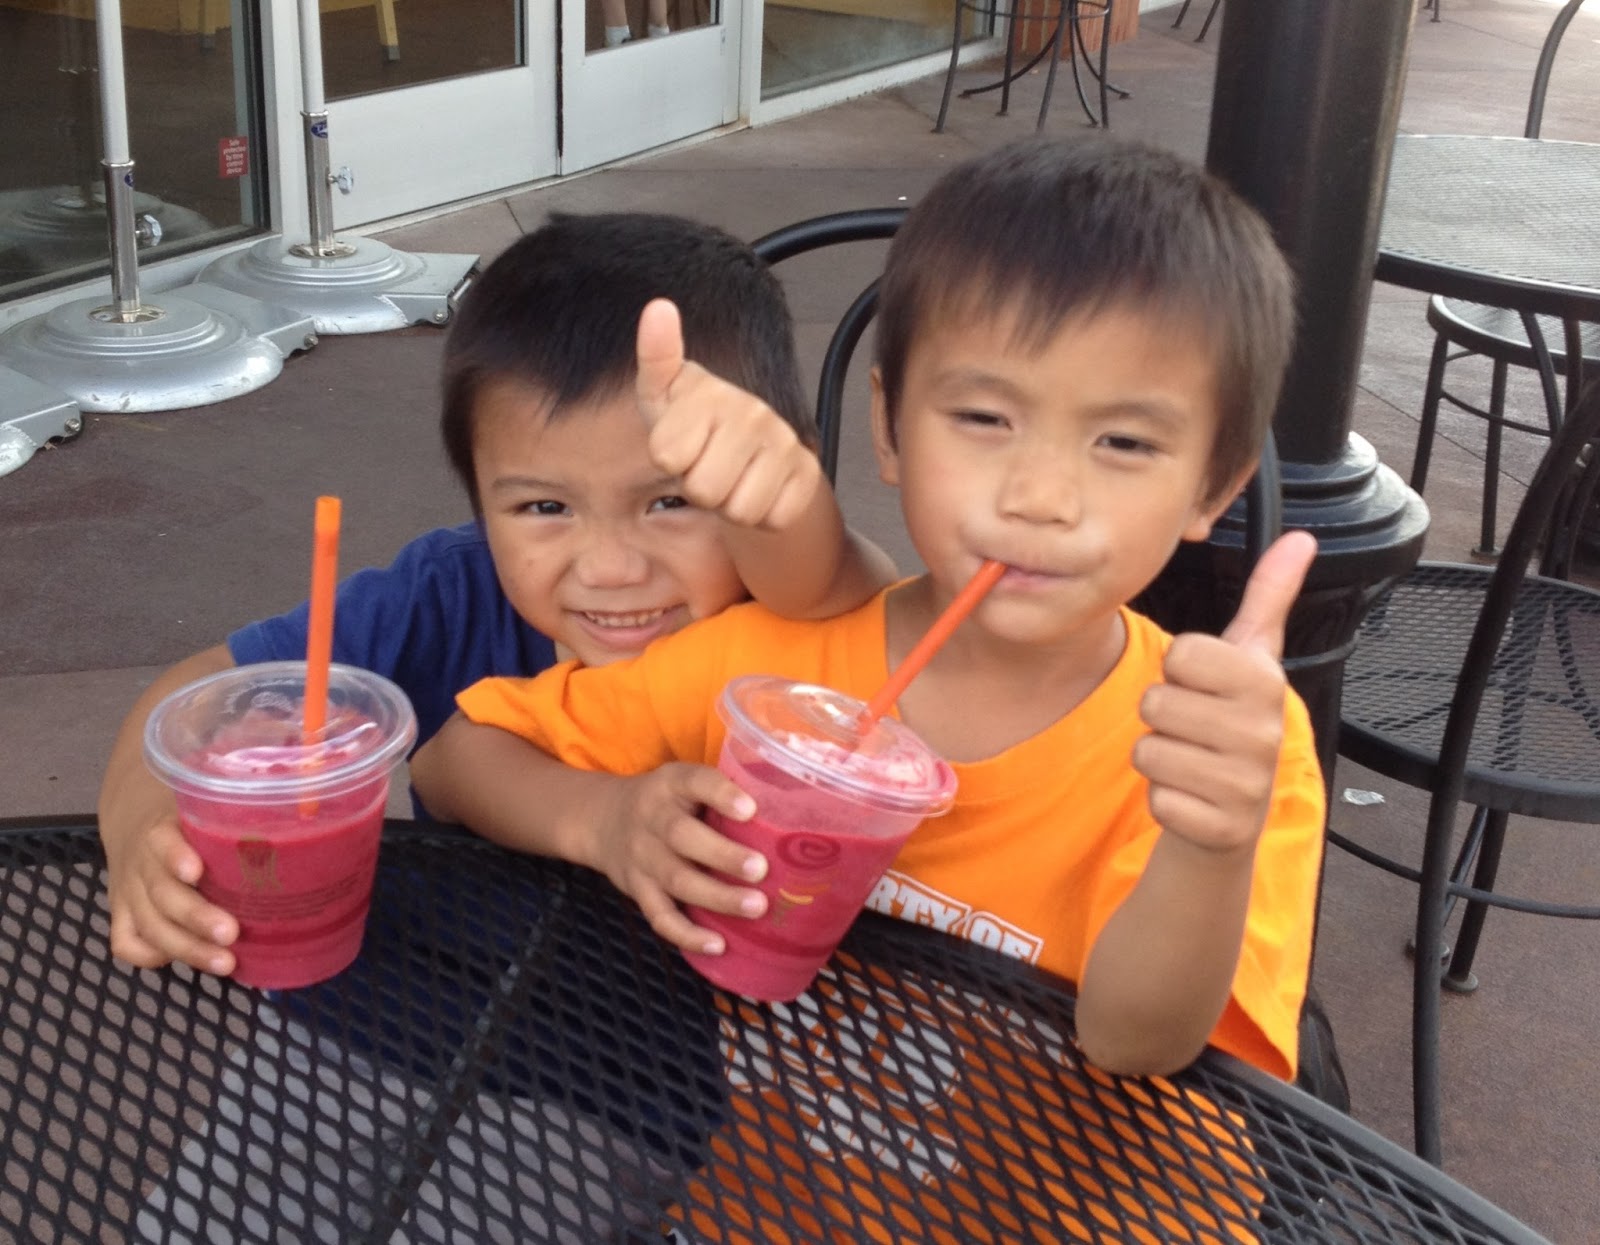
         The flavor I was asked to try is Tropical Harvest which is made with mangoes, peaches, passion fruit, yellow veggies (sweet potato, carrot and butternut squash) and ice.  Aside from being refreshing delicious, I love that this smoothie does not contain added sweeteners like refined sugar and even organic syrups.  Thus saving me lots of unwanted calories.  Would you believe that a small size (Sixteen) is just 230 calories and it does taste sweet and not watery. Also, don't let the added vegetables scare you.  All six of us (including my husband and 4 kids) tried the smoothie and none can't tell that there are veggies at all.  When I asked them what it tasted like, they just replied mango.  In fact, both of my girls liked it more than the ones for the kids.
 
 Tropical Harvest Smoothie
 
           As for my children, each pair get to share a cup of the Jamba Kids Berry Beet It Smoothie.  This yummy treat is made with strawberries, banana, mango, mixed berry juice and even veggies most are scared to eat like beets, broccoli, kale, carrot, lettuce and spinach.  Texture wise, it was really thick and creamy. Almost like a milkshake. What surprised me the most is how the leafy greens where nicely incorporated in it.  It was really smooth and no tiny specks at all.  We do lots of smoothies at home and there are always noticeable small pieces of leaves.  Taste wise, all we can tell is banana with a hint of strawberry.


          Honestly, I have never been Jamba Juice before this review.  Why? Because I have this pre conception that most Smoothie shops are dairy based and offers only things that are yummy yet loaded with unwanted sugars.  Then there are those specialty shops that change a fortune for a cup of  healthy yet most of the time questionable when it comes to taste.
 
         I am very happy to have been selected to review Jamba Juice Fruit and Veggie Smoothie as well as the Jamba Kids Meal.  Not only was I able to find a place to take my food allergy children, I was also introduced to a establishment that cares about delicious, affordable, healthy and natural food for everyone.   As you all can see, all four of my kiddos gave both smoothies a thumbs up.  They even ask for a Jamba when we go to the mall.       


             Shhh....  here's a quick tip.  Be a Jamba insider thru their Facebook page to get updates for deals and special offers.   I know you all like that. 
 
         Have a great weekend!
 
 
-Roz     

Tuesday, July 9, 2013

A Stack of Gluten Free and Vegan Mint Chocolate Mini Donuts

          Summer is in full swing and I'm pretty sure if you have young children in the house, your grocery bill is competing with your electric bill. In our case, the more outdoor activities the kids have, the more they asked for food.  I barely can keep up with the demand.  Since it's too hot to turn on my trusted oven, I used my beloved donut maker to stock up on quick snacks.

        Thin Mints are my children's favorite Girl Scout cookie.   Before the food allergy diagnosis nine months ago, our family would have boxes after boxes of this highly addictive treat.  We do have 2 Girl Scouts trying to get the much coveted patch after all. 

          Though my girls still sold GS cookies this year, we didn't purchase much for ourselves.  Aside from yours truly, there's no one else fit to eat those delectable yet non food allergy friendly delights.  Then one day, while I was preparing to make some mini donuts, child #3 asked why we can't make some Thin Mint donuts.  Light bulb moment! I decided to play around in the kitchen and after a few trial and error, I was able to create a recipe that my toughest critics approved. 

          Whether you are having a big case of GS cookie craving, wanting a food allergy friendly treat or simply wanting to try something new, give this one a go.   I'm sure you'll love them too. If you need any help just let me know.

- Roz


Ingredients:
 
1/2 cup cocoa powder
3/4 cup oat flour
1/4 cup rice flour
1/4 cup potato starch
1 Tbs. baking powder
1 Tbs. flax meal
3 Tbs. lukewarm water
3/4 cup flax milk (or other non dairy milk)
2 tsp. rice vinegar (you can also use apple cider vinegar)
1/4 cup coconut oil
1/2 cup raw cane sugar
1 tsp. vanilla extract
1/2 tsp. mint extract
 
Glaze:
1/2 cup chocolate chips
1 tsp. mint extract
 
1. In a small bowl, make a flax goo by mixing the flax meal and water. Set aside for at least 5 minutes before using.
2. Prepare the non dairy "buttermilk" by combining the flax milk or any non dairy milk and rice vinegar. Set aside.
3. In a big bowl, whisk the cocoa powder, oat flour, rice flour, baking powder and potato starch.
4. With the help of an electric mixer with a paddle attachment or a hand mixer, cream the coconut oil and sugar until light in color.
5. Add the flax meal goo and mix until well combined.
6. Alternately add the flour mixture and buttermilk mixture. Remember to start and end with the flour mixture. 
7. Add the vanilla and mint extract.  Mix just until combined.  Be careful not to over mix.
8. Pour about 2 tablespoons of the batter on each slot of a preheated donut maker and bake for 5-6 minutes. 
9. Once baked, cool in a wire rack for a about 10 minutes before frosting.
10. To prepare the frosting, transfer the chocolate chips in a microwave safe bowl and melt it on high for about 40 seconds in 15 second intervals.  Make sure not to overheat the chocolate. 
11. Once melted, add the mint extract and mix until well combined.
12. Dip the cooled mini donuts in the chocolate mixture and transfer to a cooling rack until the chocolate coating sets.
13. Enjoy! 
     

Wednesday, May 1, 2013

Food Allergy Friendly Vegan Creamy Chocolate Frosting

       So, what is the most important part of the cake?  For most people especially my kids, it's the icing or frosting! In fact, given a choice, they will just eat the frosting and leave the cake naked! 

       On my part though, I am not a big icing eater.  I like the cake part more.  That is why taste is really important.  If I ever eat some frosting, I am quite the picky type too.  It should be not too sweet, creamy and loaded with flavor too.  Come on, if I'm going to indulge, it should be worth all the calories right?

        Here's my take on a creamy chocolate frosting.  You'll notice that I did add a pinch of salt in it.  It's a trick I learned from my teacher in one of those cake decorating classes. Since butter is out of our diet, I used oil. Since I added some fresh apple sauce, I am happy to give this treat to the kiddos.  Hey, it's still fruit!

       Without much more intro, here's the recipe for the yummy food allergy friendly chocolate frosting.  Give it a try and please let me know if you love it too.

        Enjoy!

- Roz    


Ingredients:

1 cup unsweetened cocoa powder
4 cups powdered sugar
1/4 cup coconut oil (you can also use grape seed or canola oil)
1 1/2 tsp. vanilla extract
1/4 cup apple sauce
1/4 tsp. sea salt (finely ground)
3-6 Tbs. coconut milk (you can also use almond, rice or flax milk)

1. In a big bowl, combine cocoa powder, powdered sugar, apple sauce and sea salt. 
2. Slowly whisk in vanilla and coconut oil.
3. Add 3 Tbs. milk and beat until creamy (about 3 minutes). To incorporate more air and make a lighter frosting, I suggest you use an electric mixer.
4. If the frosting is a bit stiff, add a tablespoon of milk at a time until you reach your preferred consistency. 
5. Use immediately. 

* Refrigerate frosted cupcakes.  High heat will make it loose its consistency.  You can make it fluffier by putting the prepared frosting in the refrigerator for 30 - 40 minutes and whipping it before using.
 

Friday, April 26, 2013

Gluten and Nut Free, Vegan Fudge Chocolate Cake

       My family is not vegetarian much so vegan.  We are just normal foodies trying to eat healthier.  When my children were diagnosed with multiple food allergies, we have to eliminate eggs, dairy, soy, nuts, peanuts and yes, wheat.  Baking has been a real challenge since I have to come up with recipes that are not only vegan but also gluten, soy and nut free.  Oh I have to specify too that the taste must be close to the "real thing" since the kiddos used to eat the regular kind before and it will be hard to fool them.

         Chocolate Cake is always big in our house.  Pre food allergies, our favorite is Ina Garten's version.  The coffee in her recipe really brings out that deep indulgent chocolate flavor. For a while, we haven't had any of this treat because I have to replace almost everything in the recipe and deep inside I'm scared to make one for it may not turn out as good.  I don't want to be the one to finish a whole cake that's not worth every calorie!

        Then last week I came across Chef Chloe's new Vegan Dessert Cookbook.  Her recipe was quite simple but is not completely gluten free. I tried her recommended gluten free version and the result was quite good.  I didn't stop there though. By now, you all know that delicious food isn't enough.  I have to lessen the fat and sugar content.  Plus I need to sneak in some healthier ingredients. 

       So after a much tinkering, I finally came up with my own chocolate cake.  Since I serve this to the kids, I used decaffeinated coffee granules.  For a grown up version, you can use brewed strong coffee instead of the instant coffee.  You can also add a Tablespoon or two of Kahlua Coffee Liquor to start the party.    

       Since I'm running late, I'll post the recipe for the Creamy Chocolate frosting tomorrow.  If you're super excited to try this though, don't worry, my kids love it as it is. Just drizzle some melted dairy free chocolate and it's a treat.

       Enjoy your weekend!

- Roz


Ingredients:

1 3/4 cups gluten free flour mix (you can also use Bob's Red Mill Gluten Free All Purpose Baking Flour -- 44 oz )
1 1/2 cups turbinado sugar (or any raw sugar)
3/4 cup unsweetened cocoa powder
1/2 tsp. baking soda
1 tsp. baking powder
1/2 tsp. sea salt
1 tsp. ground cinnamon
1/4 cup coconut oil (you can also use canola or sunflower)
1/4 cup unsweetened applesauce
1 Tbs. apple cider vinegar
1 tsp. vanilla extract
1 cup coconut milk (you can also use almond, rice or flax milk)
1 cup hot water
2 Tbs. instant decaf coffee granules (you can also use regular coffee granules)

1. Preheat oven to 350 degrees.  Lightly grease 2 pans (9 inch) or if making cupcakes, line standard muffin pans with paper lines.  This recipe will produce about 24 cupcakes.
2. Sift flour, baking powder, baking soda, salt, cinnamon and salt.  Set aside.
3. In a small cup, combine coconut milk (other non dairy milk) and apple cider vinegar. Mix well.
4. In a separate cup, dilute coffee granules in hot water. 
5.With an electric mixer, cream the sugar, oil, vanilla and applesauce.
6.Alternately add the flour and coconut milk mixture.  Start and end with the flour.
7. Slowly pour the coffee mixture and mix just until combined. Make sure that you don't over mix.
8. Divide the batter to fill the two pans or when making cupcakes, fill each mold up 2/3 full.
9. Bake for 30-35 minutes or until a toothpick inserted in the middle comes out clean with a few crumbs.  For cupcakes, bake for 16-20 minutes and do the toothpick test. 
10. Remove from the oven and let it cool completely on a cooling rack before frosting.

Thursday, March 28, 2013

Gluten Free Vegan Zucchini Bars

          Before I became a food allergy mom, I always bake snack treats for my children.  It's my sneaky way of making sure the kids especially Child #2 eat vegetables and fruits.  The zucchini bars or Z bars as we call it, are a staple in their lunch bag. The original recipe that I developed for these bars is loaded with fresh veggies, applesauce and has reduced amount of sugar.  Something that makes me smile every time they ask for another slice.  (wink, wink)
 
           When we started to convert to a gluten free lifestyle and eliminate the food allergens of the kids, I spent a lot of time researching and trying flour combinations to recreate these Z bars.  Unlike carrots or apples, I found out that zucchini tends to be less forgiving and temperamental if prepared without eggs and wheat.
 
            After some or should I say many trial and error baking sessions, I finally came up with this new Z bars.  This recipe produces a very moist cake-like texture making it really addictive.  It is not very sweet so it's fine kick it up a notch by serving it with some frosting or even buttery spread.  If you are able to get young fresh zucchini, you can use it with the skin on. Otherwise, I suggest peeling some of the skin off because it will leave a bitter after taste. 
 
           Give this recipe a try, you can even use it for a birthday cake.  I'm pretty sure your family will love it as much as we do. 

           Enjoy!

-Rozelyn


Ingredients:

3/4 cup canola oil
1/4 cup unsweetened applesauce
1 cup sugar
3 Tbs. flax meal
9 Tbs. lukewarm water
2 1/4  cups grated zucchini
2 1/4 cups Gluten Free Flour Mix (see it here)
2 tsp. baking soda
1 tsp. baking powder
1/2 tsp. salt
2 tsp. ground cinnamon
1 tsp. ground nutmeg
2 tsp. vanilla extract

1. Preheat oven to 350 degrees.  Line a 9x13 pan with aluminum foil or parchment paper and lightly grease with oil.
2. Make flax goo by combining flax meal and water in a small bowl.  Set aside for at least 5 minutes before using.
3.  In a big bowl, whisk gluten free flour mix, cinnamon, salt, baking soda, baking powder and nutmeg.
4. Using a mixer, cream the oil, sugar and flax goo for about 2 minutes or until well incorporated. 
5. Then add the vanilla extract and zucchini.
6. With the mixer running on low, slowly add the flour mixture.  Don't over mix.
7. Pour the batter on the prepared pan and bake in the oven for 50 - 70 minutes. The bars are done when a toothpick is inserted in the middle of the pan it comes out clean.
8. Move the pan on a wire rack and let the cake cool completely before cutting and frosting.

Saturday, March 16, 2013

Best Vegan Banana Snack Cake - Without Gluten and Soy Too

      When I first learned about my children's food allergies, I didn't worry much about regular meals.  Since our family are big rice and stew eaters, I know the changes will not be as drastic. My head started spinning however, on how will I replace their favorite baked goods. 

       I am not from the South but I always have some baked goods on hand.  Snack cakes in particular are a mainstay in our kitchen.  Sounds unhealthy?  Not really! In fact, I bake those little treats to make my kids especially Child #2 and Child #4 eat more veggies and fruits.  

       Before their food allergy diagnosis, I make snack bars loaded with zucchini, carrots, apples, or whatever vegetable or fruit purees I can get my hands on.  We even came up with weird names such as Z bar and Monkey bar just to hide what's inside that treat from my pickiest vegetable/fruit eater.  Call me crazy but I did that just to give the kids their recommended amount of the healthy stuff without much fight.

       When the doctor told me to remove Wheat, Egg, Dairy, Peanut, Nut and Soy in our diet,  I was like "Are you kidding me?  How can I possibly bake something without those ingredients?" After a few months of trial and error, I'm slowly learning to bake again. 

      So far, this recipe for a Banana Snack Cake is hands down the best we've had since our diet change.  Texture wise, it's soft and moist, you wouldn't even think it's free of eggs and gluten.  Just frost it and decorate, you'll have a yummy allergy friendly birthday cake in no time.  You can even make regular cupcakes using the same batter by adjusting the baking time to 16 - 18 minutes.

       Please take note that I specifically use a certain flour mix for this recipe.  Though there are so many ready made gluten free  flour mixes available out there, some great, not so great and some meltdown worthy, especially if you can't use eggs, I decided to take the guess work out for you.

       Food allergies or not, I hope you'll give this one a try.  If you do, just don't forget to let me know. 

      Have a great weekend!

- Roz


Ingredients:
3 Tbs flax meal
9 Tbs lukewarm water
1 cup sugar
1/2 cup canola oil
2 3/4 cups mashed very ripe bananas
1 Tbs mayonnaise (I used Vegenaise Soy free)
2 tsp vanilla
1 1/2 tsp baking powder
1 tsp baking soda
2 cups Gluten free flour mix (See below)
1/2 tsp salt
1/4 cup flax milk
1/4 tsp rice vinegar
extra oil to grease the pans

1. Preheat oven to 350 degrees. Line 2 9-inch pans with aluminum foil and lightly grease with oil.
2. Combine flax meal and water in a small bowl to make flax goo. Set aside.
3. In a separate container, mix vinegar and milk. Set aside.
4. Sift the gluten free flour mix, baking powder, salt and baking soda in another bowl.
5. Using an electric mixer, cream the oil and sugar for about 2 minutes.
6. Add the flax goo, mashed bananas, mayonnaise and vanilla. Mix until well combined.
7. With the mixer running on low, alternately add the flour mix and milk mix.  Start with 1/3 of the flour and 1/2 of the milk.  Make sure to end with the flour mix. 
8. Divide the batter to fill the two pans.
9. Bake in the oven for 25 - 28 minutes.  Use the toothpick test to check if it is done.  (Poke the middle of the cake with a toothpick.  When the toothpick comes out clean, the cake is ready.)
10. Transfer to a rack and let it stand for 5 minutes before lifting it from the pans.
11. Let it cool completely before frosting or cutting into bars.

Gluten free Flour Mix c/o Connie Sarros
2 1/2 cups rice flour
1 cup potato starch
1 cup tapioca flour
1/4 cup mung bean flour
2 Tbs. xanthan gum

Sift together, transfer in an airtight container and store in a cool dry place.  Above measurements will give you 5 cups of GF Flour mix.
* Except for the xanthan gum, all these flours are individually available at your local Asian store.  They are very affordable ($1 -$3 a bag and watch out for sale too) and you'll have more than enough to use for other recipes. 
Related Posts Plugin for WordPress, Blogger...