Showing posts with label allergy friendly. Show all posts

Monday, March 25, 2013

Finally A Dairy Free Chicken Alfredo Pasta

      Chicken Alfredo is one of my favorite pasta dishes.  There is something so comforting about the creamy, salty and cheese laden sauce that makes it such a special treat.  So when the food allergy news broke, I thought I will never have the chance to cook this yummy pasta dish at home anymore. 
     
       One day, while preparing for dinner, my children started asking for a white pasta sauce. Just my luck.  How can I possibly make a cream sauce without cream or milk? I'm pretty sure coconut milk, unsweetened rice or almond milk will not be a good alternative because these kids know what an Alfredo sauce should taste like.  Cream cheese even the vegan one is out of the question too because of the soy content. Challenging? Oh yeah.  Impossible? I don't think so. 
 
        While looking for the can of anchovies in the pantry, (Yes! I put some anchovies in my regular Alfredo sauce.) I accidentally came across this can of cannellini beans.  Light bulb moment!  If I can make these beans really creamy and add enough flavor, I might be able to get a taste close to our beloved cream sauce.  So where do I get this weird idea? Okay, I confess, I have an obsession with the show Chopped and it looks like it's paying off. :D
 
        After a few tinkering, I finally came up with this recipe.  Take note that I didn't use any salt because the anchovies gave it the much needed flavor.  If you are not into anchovies, you can use bacon instead.  Simply put raw bacon pieces (about 5 stripes) in a big pan and cook until you have about 2 Tbs. of bacon grease. Remove the cooked bacon and use the grease to sauté the sundried tomatoes and make the sauce.  Once the dish is done, crumble the bacon and sprinkle on top.  You may have to add some salt in the sauce because the bacon doesn't have the same salt content as the anchovies. 
 
        Give this one a try, it's a little healthier than the original Alfredo Sauce too. Who knew cooking food allergy friendly dishes is starting to be fun?
 
        Happy Monday!
 
- Rozelyn


Ingredients:

1 15 oz. can cannellini beans
4 cloves garlic
1 1/2 cup chicken broth
1 tsp. extra virgin olive oil
1 2 oz. can anchovies in Extra Virgin Olive Oil
1 cup cooked chicken breast (sliced thinly)
1/2 tsp. nutmeg
1/2 tsp. onion powder
1/2 tsp. ground black pepper
4 oz. Daiya jack style cheese (shredded)
2 Tbs. sundried tomatoes chopped
3 Tbs. fresh sage chopped
1 lb. gluten free pasta of your choice (cooked according to package direction)
* some pasta liquid (water where you cooked the pasta)

1. Using a blender or food processor, puree the beans, garlic and broth until really smooth and creamy. Set aside.
2. In a big pot, sauté the anchovies in olive oil until it turns into a paste. Mix in the sundried tomatoes and let the flavors blend for about 2 minutes.
3. Add the pureed bean mixture, chicken and season with black pepper, nutmeg and onions powder.  Bring to boil.
4. Lower heat and add shredded Daiya cheese substitute.  Mix well until the cheese melts.  Taste and adjust seasonings if necessary. If needed, add some salt.
5. Add the cooked pasta and stir to coat with the sauce. 
6. Turn off heat and sprinkle the chopped sage.
7. Serve hot. 

Tips:
      If the sauce is too thick, add some pasta water. 
      Puree the beans really well and simmer it for at least 10 minutes to remove the grainy texture.
     

Friday, October 26, 2012

Our First Trick or Treating with Food Allergies

      It's that time of the year.  Both children and adults' minds are occupied with just two things --- costumes and candies!  (Hurricane Sandy is slowly getting some attention here in the tri-state though). Anyway, as a mom with kids who have food allergies, I know that it can be a stressful, VERY stressful time.
      Since this is our first trick or treating with food restrictions, I decided to make a deal with my children.  We will still go out in our costumes and gather some sweets.  Just like the previous years, they still have to give me all the candies to check out before they can eat any. Once sorted, they will get to keep those that do not contain ingredients they are allergic to. As for the rest, we will all donate it to my son's past pre-school which in turn will send it as part of the care packages for our troops abroad. 
        Did they like the idea? Oh yes!  They are even more excited because they are doing something for a good cause.  Since I am pretty sure that might they will only get to keep about 10% of their hard earned goods, I also started to prepare. 
         After a lot of label reading, I was so surprise to find these treats at the local Home Goods store.  Organic candies and lollipops from Yummy Earth. These candies are all gluten, egg, dairy, nut and soy free. They even use natural food coloring from carrots, beets etc.  A real treat and yes, they do taste great.  Other health food stores carry them too but I suggest get these at Home Goods.  Why? Well they cost a lot cheaper.  As in 30 to 40 percent off the retail price.    


      So, are you trick or treating this year too?


-Roz

Wednesday, October 17, 2012

Fish Cakes

       As a Frugalista Mom, I always try to make easy snacks from last night's dinner. Even before our family started to go wheat, egg, dairy, soy and nut free, the practice of creating something out of leftovers is already a must. Not only this habit saves me some precious time but most importantly, it helps a ton in staying within our grocery budget.

       These fish cakes made with already cooked tilapia fillets are a breeze to prepare and are very affordable.  In fact, this recipe enabled me to use the super pricey cheese substitute that we bought and my kids later refused to eat. 

        If you are not concerned about any food allergies, feel free to use regular cheese and mayonaise.  I'm pretty sure, it will turn out good too. 


Ingredients:
5 cups cooked white fish (I used tilapia fillets)
1/2 cup Daiya mozarella style shreds (If you can have cheese, feel free to use it)
1/2 cup Earth Balance Original Mindful Mayo (You can also use regular mayonnaise)
1/2 tsp salt
1/4 tsp ground black pepper
pinch of chili flakes
1 tbs chopped scallions
1 tsp fresh lime juice

1. Using your hands, flake the fish into small pieces.
2. Add the remaining ingredients to the fish.  Mix until well combined.
3. Form into patties about 3 inch in diameter and 1/2 inch thick.
4. Heat a non stick pan or griddle. (medium heat)
5. Place about 4 patties and cook about 4 minutes or until the side near the pan is golden brown.
6. Flip carefully and cook for another 2-4 minutes.
7. Serve hot. 


Note:
     - I used leftover cooked fish in this recipe.  If you don't have any available, you can either bake or steam the fish fillets. Then cool before using. 
     - Since mayo was included in the recipe, you don't need any oil to fry the fish cakes.  In fact, you will see some oil in the pan as it cooks.
     - Make sure you are using a non stick pan and is properly heated before adding the fish cakes.  This prevents it from sticking to the pan.
     -  Depending on your diet, you can serve this over rice, salad greens or even with bread.     


-Roz                  

Wednesday, September 26, 2012

Easy Beef and Veggie Stew

     Fall is here.  As the leaves change colors and the temperature slowly cools down, a hearty stew seems to be the most comforting meal after a long day of work.   

     This dish is one of our family's favorites. Since we are now on a GEDS free diet, I have made some revisions but it's still delicious and so easy to prepare.   


Ingredients:
 
3 tbs canola oil
2 lbs beef chunks (about 2 in squares)
1 tsp minced garlic
1 large yellow onion sliced (half moon)
1 cup chopped celery
2 cups chopped tomatoes (you can also used canned)
1 cup chopped parsnip
1 cup chopped carrots
2 pcs dried bay leaf
1 Quart chicken broth (I used organic, gluten free)
1/2 tsp dried rosemary
2 cups potatoes cubed
1/4 tsp ground pepper
2 tsp salt (Start with one tsp and slowly adjust according to your taste. The chicken broth has added salt)
2 tbs chopped fresh parsley
 
1. Preheat a dutch oven or a heavy stew pan.
2. Sautee the garlic and onions in canola oil.
3. Add the tomatoes and cook until the tomatoes are mushy.
4. Slowly add the beef chunks and brown the meat. It will not get a nice caramelization which is fine.
5. Pour in the chicken broth and mix well. Make sure to scrape the brown bits on the pan. Bring to a boil.
6. Once boiling, add the carrots, celery, parsnip, bay leaf and rosemary. Cover and simmer for 35 mins.
7. After 35 mins, check if the meat is almost tender.  Add the potatoes and season with salt and pepper.
8. Cover and simmer until the potatoes are done.  About 15-25 mins.
9. Serve hot over rice or gluten free pasta.
10. Enjoy.
 
           
          Are you having a get together or a party soon? You can easily double the recipe and feed a big crowd. Transfer it to your crock pot to stay warm.  Your friends will love this allergy friendly recipe. 
 
          Happy Wednesday!
 
- Roz


Thursday, September 20, 2012

The Quest for GEDS Free Brownies Part 1

 
       It's that time of the year.  Halloween, school bake sales and even birthday parties are fast approaching.  You know what that means right?  Cupcakes, cookies, brownies and candies will be the talk of the town.  So what's a Frugalista Gluten, Egg, Dairy and Soy Free mom got to do?  So far, there are two options I am considering. 1. Say NO to every event and hide my kids inside the house. 2. Challenge myself and make the above mentioned treats only now GEDS free.
 
      Though the first option seems to be the easier thing to do, I think my children will appreciate it if I choose the later. Okay ladies, I am not running for any "Mother of the Year" award here. I simply want my children's transition to their new diet as easy as possible.  How hard will it be to make a  GEDS free Brownie anyway? I may not be a trained pastry chef but with more than 10 years of baking from scratch almost every week plus some catering in between, I'd say, I should be confident in my skills right? 
 
      For starters, I decided to try some ready made brownie mix. Hmmm.. I'm seeing some eyebrows raised here. Why would a self professed baker use something out of the box? Well, it is because right now, my food budget prohibits me from buying all the different types of flour most recipe books require me to have. Since specialty items are crazy expensive, I invested on the most basic such as egg replacement powder,  xantham gum and magarine (dairy and soy free).
 
      While shopping at Wegman's last weekend, I came across this Double Chocolate Brownie Mix.  At $3.49 a box that makes an 8x8 inch batch, I think, it will not hurt to try it.  After all, it's half the price of the All Purpose Baking flour that still requires extra pricey additions.
 
 
         I made these brownies last Monday. There were extra steps such as melting the included chocolate chips and beating the eggs with a mixer. Nothing complicated. The instructions were clear and so easy to follow. Instead of the required 2 eggs and butter, I used the egg replacement (prepared according to the package instructions) and the nondairy, soy free magarine. The batter looked good and had the consistency of a regular brownie batter.
 
         After about 15 mins, my kitchen smelled great.  I was so excited how these will turn out. Oven timer sounded off at the minimum baking time and when I checked, the sides seem to be done but the middle isn't firm enough.  I kept on checking until the maximum baking time.  Since the toothpick test isn't the best indication of doneness according to the package, I decided to take it out right after the timer went off the second time.  The center looks set and perfect but the sides are in the borderline of getting burned. 
 
        Now the verdict.  The brownies looked darker that the regular brownies and they are not burnt.  It didn't have the cakelike texture and can't hold it's shaped when cut.  It's very gooey and chewy just like a japanese mochi or rice cake.  A little greasy or oily too.  The taste however, is phenominal.  Not too sweet and full of chocolate goodness.  It passed the kids' taste test with flying colors.  In our home, flavor is much more important than looks.
 
        Technically, this treat didn't look anything like a brownie, so my children started calling it the "Blackie".  It was devoured within an hour and they actually asked me to make it again which is a good sign. For now, I would say this Wegman's brownie mix will have a place in my pantry.  It will take a few more alterations aesthetic wise but as for the taste, it is a keeper.


      Wow! I just realized that making a GEDS free brownie is not as easy as a regular one.  Even for a boxed mix, it can be complicated.  So here I am in a quest to find an affordable and delicious brownie so that my children will not feel deprived and actually enjoy as a treat. 
 
      Today, I have decided to make a batch of brownies weekly and post it every Thursday.  I definitely need your help in this quest  - your IDEAS that is.  If you have a go-to brand of brownie mix or a favorite recipe you'd like to share, please let me know at thefrugalistamom@gmail.com. Just make sure that it is Gluten, Egg, Dairy and Soy free.  I'm sure there's a group out there waiting for to make that coveted dessert. 
   
       Hope to hear from you soon.
 
 
- Roz
 

Monday, September 17, 2012

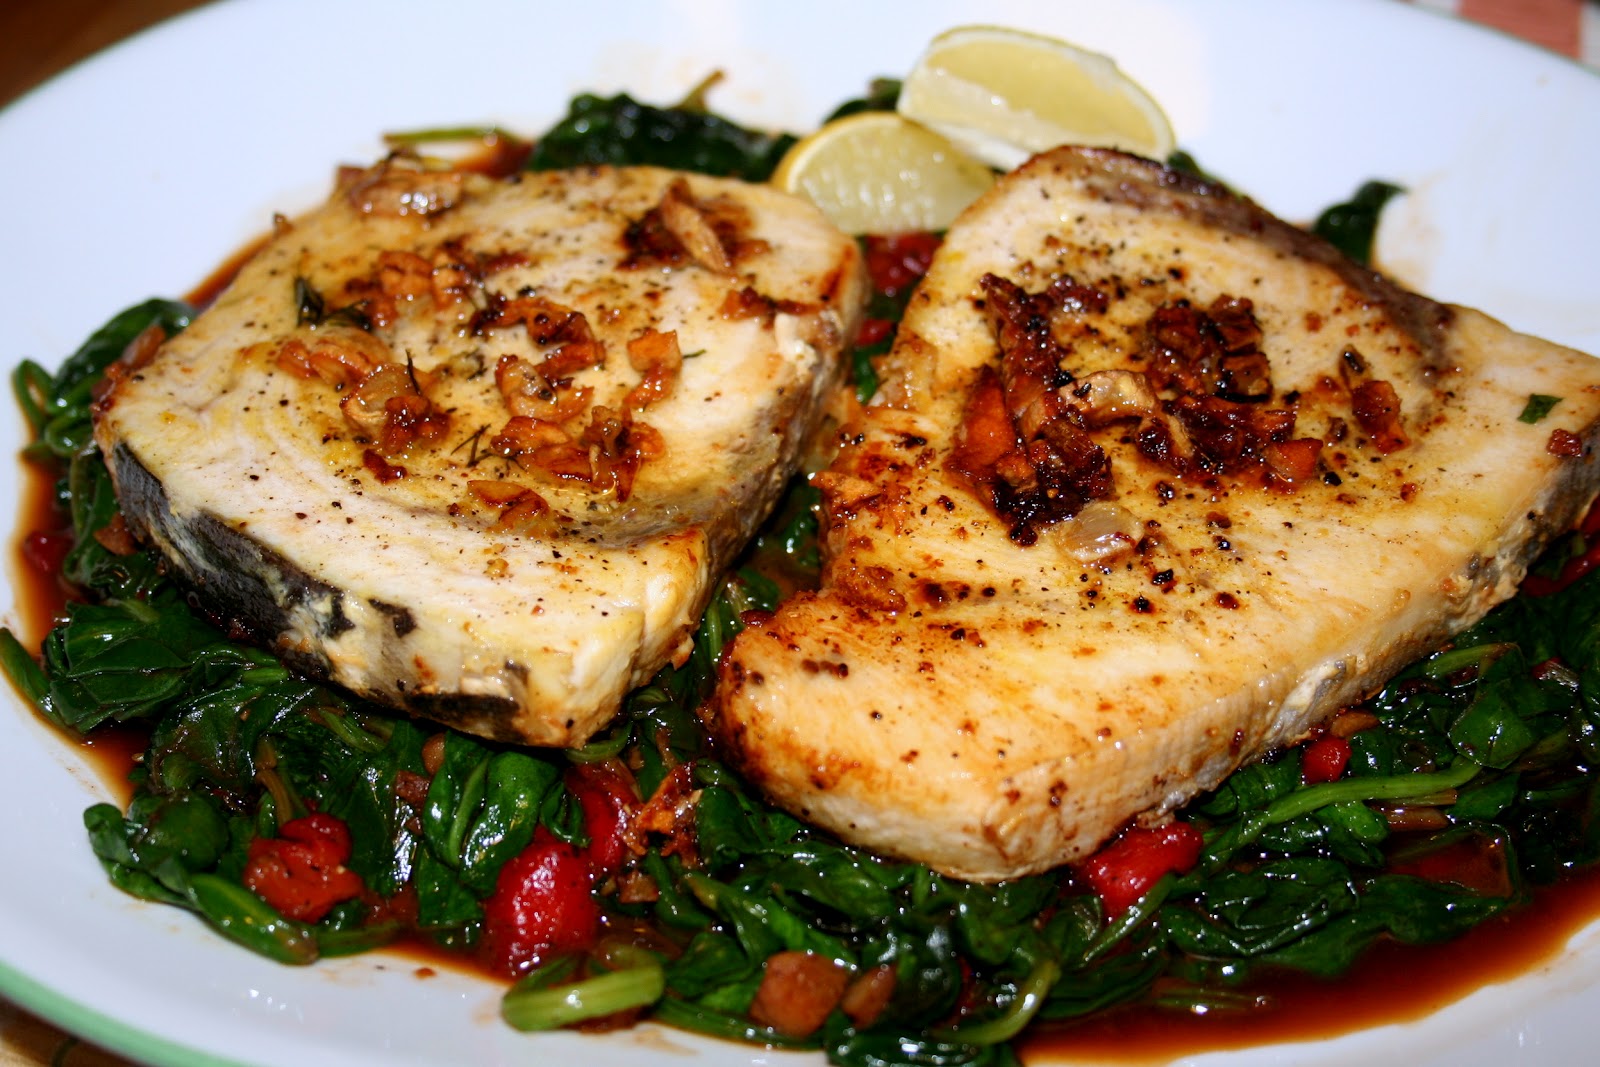
Garlic Tuna with Wilted Baby Spinach and Roasted Red Peppers

      Our family loves Tuna.  Whether from the can, cooked, or even sashimi (okay, the last one is just for me), it is one of our go to protein at home. So when the news about each child's food allergies came out, we were so  thankful that FISH was not in the list. 
 
       This easy to prepare dish is one of our favorites and goes perfectly with steamed white or brown rice.  Surprisingly, our household has been enjoying this GEDS (gluten, egg, dairy, soy) free recipe way before the diagnosis came out.   


Ingredients:
4 Fresh Tuna Steaks (about 1 1/2 lbs total weight)
2 tsp. Salt
1 tsp. ground Black Pepper
1/2 tsp. Garlic Powder
6 tbs. extra virgin olive oil
2 tbs. fresh garlic sliced thinly
1/4 cup roasted bell peppers *
2 bags of baby spinach
1/8 tsp. chili flakes (add more if you like it a little spicy)
2 lemons

*Roasted Red Bell Peppers
        I often have a homemade version ready and I provided the recipe at the end of this post.  Just in case you don't have the time to make your own, feel free to substitute a store bought one.  I prefer the one that is packed in oil. 

1. At medium low heat, saute sliced 1tbs sliced garlic in 4 tbs of olive oil until golden brown. Make sure you don't burn it. Transfer to a plate and set aside. Increase heat to medium and keep the pan hot.
2. Combine 1 tsp salt, 1/2 tsp black pepper and 1/2 tsp garlic powder.
3. Pat dry tuna and rub both sides with the salt, pepper and garlic powder mix.
4. Pan fry tuna. Wait at least 2 minutes before flipping.  Cook according to your desired doneness and transfer to a platter.  We always have ours well done.
5. Add the remaining oil to the pan.
6. Saute sliced garlic and chili flakes until garlic turns golden brown.
7. Add the roasted bell peppers and spinach.
8. Season with remaining salt and black pepper.
9. Cook until the spinach are slightly wilted.
10. Turn off heat and drizzle with juice from 1 lemon. Mix.
11. Transfer veggies to a serving platter.  Top with seared tuna and sauteed garlic. 
12. Serve with rice and lemon slices.

Tips:
 * Make sure the pan and oil is hot (medium to medium high) before putting the fish. This will help prevent the fish from sticking to the pan.

* When it comes to doneness, some likes the tuna just browned on both sides while the inside is still pink or red.  For my family (since we have young children), the fish is cooked through. Depending on the thickness, it's about 3-5 minutes on each side. Use your fingers to check for the desired firmness. It is always better to go a little undercooked.

* Homemade Roasted Peppers
    - Preheat oven to 400 degrees.
    - Wash and dry the bell peppers.
    - Place bell peppers on a foil lined cookie sheet. 
    - Bake in the oven for about 14-20 minutes  Turn the peppers every 4 mins to make sure all the sides get roasted and to avoid burning one side. 
    - Transfer to a glass bowl and cover with a plate for 5 minutes. The trapped steam will help loosen the skin,
    - While still warm, remove the skin and the seeds.
    - Add some extra virgin olive oil.  Mix well.  You can add some spices or seasonings at this point.
    - Once cooled, transfer to storage containers.  Refrigerate for 3 days or freeze.


Saturday, September 15, 2012

Return of the Pancakes

      It has been a week since my first attempt to cook GEDS (gluten, egg, dairy, soy) free.  Looking back, I can't help but smile and laugh about my early Saturday morning Pancake meltdown. Thank God my Facebook friends were blessed with so much patience. Last time, I've checked, no one has removed me from their friend list yet. So without further intro, here's the story.
 
      Saturday is always about having pancakes for breakfast.  Just like any mom who would like to keep the transition as smooth as possible, I stayed up all night looking for a pancake recipe that is GEDS free.  When I finally found "the one" that looked very basic and easy to follow, I bookmarked it and got ready for an early trip to the store.  At 7:30 am, my kitchen was husling. 
 
      After carefully following the instructions, I was so surprised that my first 2 batches of supposedly pancakes turned out to something else. It was so gummy, sticky and inedible. Most would just throw the whole thing right away. The Frugalista in me however kicked in. Come on, that's a big batch of expensive ingredients --- all purpose gluten free flour, almond milk, xantham gum!  I may not be a professional chef but I totally know my way around the kitchen.
 
      Trying not to give up, I turned on my laptop and started browsing maybe 3or 4 blogs including the one where I found the recipe, looking for remedies.  After making the batter somewhat edible, I started working on the texture without any success. At 10:00 am, my family is no longer happy so I decided to prepare my homemade sausage and rice instead.
 
      While the new dish was cooking, I once again read the post trying to figure out what went wrong.  Finally, I raised my hands in defeat! After scrolling through the list of comments, the writer said that "a particular type of  FLOUR was used in the recipe and when tried other types of flour, the result is a gummy mess".  My goodness!  That was the first rule when going Gluten Free. There is no exact substitute for wheat flour. The success relies on the combination of the different types of flour and its reaction to the other ingredients in the recipe.
 
      Finally, after some trial and error, I was able to have an affordable and  decent GEDS free pancake. Okay, it's not from scratch but this pancake and waffle mix from Cherrybrook Kitchen is a real lifesaver.  All my four children love it.  
 
      At $4.49 for an 18 oz box, (I got mine from the local Wegman's) I say, this is worth every penny.  It is so easy to prepare and is error-proof.  I just added almond milk and canola oil (even tried it with olive oil) in the specified amount printed on the box and the batter is good to go.  Though the uncooked batter may feel a little grainy, it will not be noticeable once cooked.  The manufacturers even specified that there will be no bubbles to indicate when the pancake is ready to be flipped.  Once the sides of the pancakes look firm and set, it's time to flip.         
      
      
Click to view larger product image.


        Aside from having the right texture and good taste, I found out that I can make these pancakes ahead of time and will stay fresh quite well.   It can be refrigerated and later microwaved without problems.  My children brought it to school yesterday and it stayed moist and fluffy until lunch time. 
 
        Isn't it great to find something that will make our lives easier?  This brand is now part of our pantry staples.  How about you? Do you have a Go-To Pancake helper?  Love to hear from you.
 
 
 - Roz


Friday, September 14, 2012

Our First Week without Gluten, Egg, Soy, Dairy, Nuts and Peanuts Menu

       It's Friday and we made it!  First week of school and yes seven days of living allergy friendly.  Guess what?  It was not as bad as I thought it would be. The kids ate without any complains on what's on the table.  They even enjoyed their food as if nothing has changed.
       I know most of you are curious. Our household is now wheat, soy, dairy and egg free. So, what then did we eat? Actually, we did quite well. Here is a peek of our menu this week:

Breakfast
* Sauteed Corned Beef with Oven Baked Breakfast Potatoes
* Pork Vigan Style Longanisa (Sausage) with Rice
* Bacon and Rice
* Pancakes

Dinner
* Pork, String Beans and Peppers in Coconut Stew
* Mung Beans with Spinach Stew
* Rice Noodles with Beef Ragu
* Chicken and Tomatoes Stew
* Chicken Wrapped in Pandan Leaves and Bagoong Rice

Lunch Box /Snacks
* Marinated Chicken Nuggets
* Popcorn
* Rice Cereal Treats
* Corn Tortilla Chips with Salsa
* Snickerdoodle Cookies
* Tuna and Rice
* Fruit  Cups

      Just like any child with food allergies, my school age kids brought their own snacks and lunch.  They either picked something from the breakfast or dinner menu and 1 or 2 from the snacks.  Plus something from the fresh fruit basket --- apples, bananas, kiwi, peach, watermelon. Seems like a lot of food? Well, I am not joking when I said that my family are good eaters.  Don't worry, I will be posting the recipes as we go. 
     It has been a crazy week.  I have never thought and studied food as much as I did during my catering days in Jersey City.  At the end of the day, all the effort was worth it.  For now, I will have my break from cooking --- leftovers for dinner. 
     
                                          Chicken Wrapped in Pandan with Bagoong Rice
                                                 (inspired by a recipe of FitChefTrina)
      

- Roz

Related Posts Plugin for WordPress, Blogger...