Showing posts with label easy recipe. Show all posts

Tuesday, August 12, 2014

Asian Style Ratatouille Recipe using World Foods Fusion of Taste Sauces

    Our family loves trying ethnic food.  Before the children were diagnosed with food allergies, Sundays usually meant food adventure. We would go to church early at 8 in the morning so that we can drive around and look for an usual restaurant. The kids grew up trying new cuisine --- Indian, Chinese, Thai, Vietnamese, Afgan, Greek, Italian, Polish etc.  As long as the food tastes good, they are happy.  

     After we found out that food allergies are to blame for their constant coughing, asthma attacks, eczema and stomach problems, our food trips almost stopped.  Yes, we still get to eat out. However, it became very limited.  Often times, just once a month and each restaurant must be carefully scrutinized before we go.     

     Since most of our meals are now home cooked, I try my best to make it more exciting by preparing international themed dishes.  I confess, I now have an tremendous obsession with spices, herbs and even flours that my kids now call our kitchen, The Lab. 


     Anyway, cooking from scratch has become a way of life for me.  I admit, it is a tedious process but it leaves me no choice because it is quite difficult to find packaged seasonings or sauces that would be go with my family's multiple food allergies. Then recently, as a Moms Meet Ambassador, I was asked to try WorldFoods Sauces and Marinades.  
       
     When I first heard about WorldFoods products, I can't help but go their website and check.  I mean, it is too good to be true. Their FREE from Range of sauces and marinades were carefully made with 100 percent, fresh natural ingredients and authentic herbs and spices.  It is also free of added oil, trans fat, artificial ingredients, preservatives, coloring or food flavor enhancers. There are no GMOs and the best part, no hidden allergens like peanuts, nuts (except coconut), dairy, gluten, egg, soy, fish and shellfish.  Yes, it is Top 8 safe.  

    After trying the 4 types of sauces they sent me to try, I have to say, these Asian style sauces are a blessing!  Not only are they allergy friendly, it makes regional food really easy and convenient. The flavors are very accurate too. (I'm an Asian remember?)  My kids love that the sauces and marinades are delicious and not too spicy like most restaurants have. For those who like it on the hotter side like me, a pinch of cayenne pepper should do the trick.  They are nice to have on hand especially on days I need to whip up something fast.


      That's me photobombing the Indonesian Fried Rice paste.  Just to let you know, I don't work for World Foods.  More so, there's no endorsement contract between us. :)

    Anyway, here's a quick recipe inspired by my children's current DVD obsession - Disney's Ratatouille.  This simple and easy dish is made with just summer vegetables and World Foods Thai Coconut Galangal Stir Fry Sauce.

      Happy cooking!

- Roz


Ingredients:

2 Tbs. canola oil
1 Tbs. minced garlic
1/3 cup chopped onions
1 cup chopped tomatoes
1/2 cup chopped red bell pepper
3 cups chopped zucchini
3 cups chopped yellow squash
2 cups chopped eggplant
1 12 oz. bottle World Foods Thai Coconut Galangal Stir Fry Sauce
1 tsp. sea salt
1 Tbs. chopped fresh parsley

1. In a big skillet, heat oil.
2. Saute the onions, garlic and tomatoes for 4 minutes.
3. Add the red bell pepper, yellow squash, zucchini and eggplant.  Saute for 4 minutes.
4. Pour the Thai Coconut Galangal Sauce over the vegetables.  Mix well.  Bring to a boil.
5. Season with 1/2 a tsp. of salt. Taste to make sure you have enough salt.  Depending on how much water the vegetables have, you might need to add the remaining 1/2 tsp of salt.
6. Simmer for 5 minutes or until the texture of the vegetables is to your liking.
7. Turn of heat and add the chopped parsley.
8. Serve hot with steamed rice or quinoa.
9. Enjoy!

Disclaimer:  I received this product for free from the sponsor of MOMS Meet Program, May Media Group, LLC, who received it directly from the manufacturer.  As a MOMS Meets blogger, I agreed to use this product and post my opinion on my blog.  My opinions do not necessarily reflect the opinions of May Media Group LLC or the manufacturer of the product.

Thursday, September 5, 2013

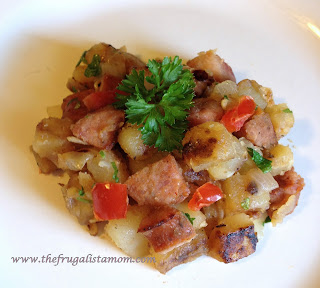
Andouille Sausage and Potato Hash Breakfast

         School is in full swing.  Though it is only the first week, I can already feel the pinch of having bigger kids.  Homework, that are more challenging, starts to come in.  The after school activities are now written in the calendar.  Pretty soon, the fast paced routine will kick in.   
 
         As the days become more hectic and crazier, I often rely on the help of a well stocked fridge and pantry for quick and healthy meals.  Breakfast in particular, can be the most daunting.  With a little planning though, I'm sure we all can provide something delicious that can make everyone actually eat and start the day right.
 
         One of my go to recipes for breakfast is this sausage and potato hash.  Loaded with veggies and protein, this is a complete meal that is very easy to prepare. You might notice that the recipe has a big yield.  Don't worry because it is also prefect for a packed lunch.  
 
          If you are like me, I would chop everything the night before and keep it on a big plate in the fridge.  That way, all I need to do in the morning is sautéing. Isn't that neat? 
        

- Roz


Ingredients:

1 package (4 pcs) Cajun Andouille Sausage chopped (I used Chef Bruce Aidells)
4 cups potatoes diced
1 Tbs. extra virgin olive oil
1 cup chopped onions
2 Tbs. minced garlic
1/2 cup chopped red bell pepper
1 tsp. sea salt
1/2 tsp. ground black pepper
2 Tbs. chopped fresh parsley

1. In a medium heated sauté pan, brown the sausage bits in olive oil.
2. Once the sausage pieces are browned to your liking, transfer it on a plate.  We like ours cooked a little crunchy.
3. Using the same pan and oil, fry the potatoes for about 7 minutes.
4. Add the garlic, onions and bell peppers to the potatoes. 
5. Season with salt and pepper.
6. Return the sausage in the pan with the vegetables. 
7. Let it cook until the potatoes are soft but firm enough to hold its shape.  Depending on the size of the potatoes it may take at least 5 minutes.
8. Turn off heat and sprinkle with parsley.
9. Enjoy hot or at room temperature.

Saturday, August 10, 2013

Easy Slow Cooked Drunken Beef Stew

         Early this morning I started buying school supplies. Can you believe it's already the second Saturday of August?  Though schools here in New Jersey are not starting until at least the first week of September,  I have this sense of urgency to prepare for the busy school year.  Oh, the autumn like temperatures lately aren't helping either.  Though I try my best to deny it, the school rush is just around the corner.  
 
          Talking about school, my growing kids seem to have a sudden jump in their appetites.  With the rate they are eating right now, I'm pretty sure putting food on the table and making their school lunches will be extra challenging.  Can you relate? 

         Anyway, one of my best helpers in the kitchen is my slow cooker.  For us with special food requirements and must cook at home all the time, that friendly device will definitely be a staple.  If you don't have a collection of trusted slow cooker recipes yet, here's a very easy to prepare and foul proof recipe that my family loves. 

        The cognac is my secret ingredient for this dish because it gives this rather simple stew some depth and complex flavor.  Don't have it on hand?  You can definitely substitute some red wine or even beer (just check the label if you want it to be gluten free).  If you are not comfortable using alcohol in a dish that you will serve your kids, feel free to use beef broth in place of the wine.  It will turn out delicious as well. 

         Give this one a try.  I'm sure you'll love it too. 

         Enjoy a relaxing Saturday my friends!

- Roz


Ingredients:
 
5 1/2 lbs. beef chuck (cut into 2 inch cubes)
2 Tbs. olive oil
2 Tbs. fresh garlic, minced
1/2 cup white onions, chopped
1 fennel bulb, chopped (about  1 1/2 cups)
1/2 cup cognac
2 cups water
2 Tbs. chili powder
1 Tbs. paprika
1 tsp. cumin
2 pcs. bay leaf
1 Tbs. salt
1 tsp. dried rosemary
2 lbs. potatoes (cut into 2 inch cubes)
2 tsp. fresh parsley, chopped
 
1. In a big heavy pot with medium heat,  sauté the garlic, onions and fennel bulb for about 3 minutes or until the onions become translucent.
2. Increase the heat to high and add the beef chunks. Cook until the meat is browned. 
3. Pour the cognac and let it evaporate for about 7 minutes. Make sure to stir the meat to avoid sticking on the pan.
4. Once the alcohol has evaporated, the meat and veggie mixture can now be transferred to a slow cooker.  Add the remaining ingredients except for the parsley.  Mix well, cover and let it cook on high for 8 hours.  
5. Just before serving, add the parsley.  Mix and let it stand for about 2 minutes.
6. Serve on top of rice or noodles. 

Monday, July 22, 2013

Easy and Healthy Roasted Asparagus, Mushrooms & Grape Tomatoes

         Can you believe that the end of July is almost here?  That means we only have a month and a few days left to enjoy the summer.  Where did the days go?  Hmmm... let's see... vacation, get together, play dates, cold drinks, BBQ, no wonder that swimsuit is slowly getting smaller!
 
          Anyway, one of the best things I enjoy every summer aside from the pool and staying outside is the availability of fresh produce. Local farmer's markets are popping everywhere.  Thus making organically grown fruits and vegetables affordably accessible. 
 
           Since most of us don't want to be locked in the kitchen, I'm sharing with you my favorite recipe for fresh vegetables.   It's simple, delicious and very healthy too.  If you are scared to use that hot oven, don't worry, this dish can also be prepared on the grill.  Just make sure to roast them on top of an aluminum foil with the sides folded a bit so that you will not lose the fresh and sweet juices. 
 
           Give this waist friendly veggies a try.  I'm sure your palate and wallet will love it too.
 
           Have a great week everyone!
 
 - Roz                


Ingredients:
 
2 lbs. fresh asparagus (washed and trimmed)
1 pint grape tomatoes (sliced in half)
8 oz. sliced mushrooms (I like baby Bella for it's meatier taste)
2 tsp. extra virgin olive oil
1/2 tsp. salt
1/8 tsp. ground black pepper
2 tsp. fresh lemon juice
 
1. Preheat oven to 425 degrees Fahrenheit.
2. In a 9 x 13 baking pan, arrange the asparagus and mushrooms.
3. Add the olive oil and lemon juice. 
4. Season with salt and black pepper.
5. Toss lightly to make sure the vegetables are evenly coated with the seasonings.
6. Bake in the preheated oven for about 15 - 25 minutes or just until the asparagus is tender.  Do not overcook.
7. Once the asparagus reached the tenderness that you prefer, remove the pan from the oven and add the tomatoes.  Mix well.
8. Let the dish stand for at least 3 minutes before serving. The heat of the mushrooms and asparagus will slightly cook the tomatoes adding another level of flavor.
9. Serve warm.

Wednesday, April 10, 2013

Sausage and Peppers Casserole - Food Allergy Friendly Recipe

       Have you missed me? I know I was out of the circulation again. Why? Well, I have extra mommy duties lately because Child #3 is currently suffering from pneumonia. Ugh! The good news is that he's responding quite well with his medication and now on the way to full recovery.  Thank God! 

       Moving on, have you been enjoying the sudden weather change? For the past few days, the people here in New Jersey (and the entire East Coast) have been experiencing summer like temperatures. You know what that means right? Time to enjoy the outdoors and casual entertaining.  

       Since our grocery bill has tripled after the food allergy diagnosis, I am now challenging myself to create recipes which are not only safe for the kids to eat but are also crowd "pleasers" and most of all, will not burn my wallet.  Though buying organic and specialty ingredients are quite pricey, I can attest that these items usually are loaded with more flavor.  By adding less costly and  healthier "fillers", we can literally feed an army. 

        Check out my take on the common Sausage and Peppers. Instead of serving whole or big chunks of sausages on a roll, these are thinly sliced and are served on top of rice.  The onions and bell peppers not only add flavor but are filling too.  Yes, your guests should eat their veggies!  The flavorful cooking broth doubles up as a sauce that gives the rice a homey taste.  No waste thus making it very affordable.  

         Bring this dish to your next gathering.  I'm sure your friends as well as you wallet will love you. 

-Roz


Ingredients:

1 lb. Italian style Pork Sausage (sliced diagonally)
2 Tbs. extra virgin olive oil
3 big cloves of garlic (sliced thinly)
2 cups onions (sliced in in half moons)
5 bell peppers (sliced into strips)
1/4 tsp. chili flakes (you can add more)
1/2 cup marsala wine
1 cup chicken broth
1 1/2 tsp. sea salt  (you might use less depending on the brand of sausage and broth you are using)
1/2 tsp. ground black pepper
8 cups cooked rice (steamed)

1. Pan fry the pork sausage in heated pan with olive oil. Do it in batches so that the sausage will have nice sear marks.  Set aside.
2. In the same pan, saute the garlic, onions and bell peppers for 3- 5 minutes or until the onions are translucent.
3. Add the Marsala wine and chicken broth. Scrape the pan to get all the brown bits incorporated in the sauce. Bring to boil.
4. Put the cooked sausage pieces back in the pan. Season with salt, pepper and chili flakes.
5. Lower the heat and let the dish simmer for 10 minutes.
6. Mix well and turn off the heat.
7. Put some sauce on the bottom of a casserole pan.  Then arrange a nice layer of rice.
8. Top the rice with the sausage and pepper mixture.  Make sure to add all the sauce.
9. Serve hot.

Tips:
 - Slightly frozen sausage is easier to slice.  Place the sausage in the freezer for 2 hours before slicing.
  - Make sure to double check the ingredient list of the sausage you are using for allergens.  My favorite is the Wegmans brand because it is free of gluten, dairy and soy.
 - For this recipe, I used the Sweet style sausage because my kids can't handle the Hot/Spicy variety.


Tuesday, March 12, 2013

All Around Beef Ragu - Food Allergy Friendly

         Hello Frugalista Moms!  It's crazy Tuesday once again.  You know that day of the week when everyone in the family is rushing from one activity to the next. Child #2 has this at 4 pm while Child #1 needs to be there at 5:30 pm, pick up Child #3 at.... and so on. 

         Pre-food allergy diagnosis, this is the day wherein the fastfood drive thru window is my best friend.   A lot has changed though.  With a little planning and sometimes the help of my new BFF (the slowcooker),  I can have dinner, snack and even next day the children's lunch covered. 

         One of my ever reliable recipes is this easy Beef Ragu.  This basic recipe is so versatile, a bunch of new dishes can be made from just a big pot of it such as:
           1. Serve on top of your favorite pasta  for Pasta & Meat Sauce
           2. Add some rinsed canned beans and chili powder - Easy Chili n Beans
           3. On top of corn chips and shredded Daiya cheddar style cheese  - Nachos
           4. With some rolls (gluten free of course!) - Sloppy Joe sliders
           5. On top of pizza crust  - Easy Meat Pizza

          Feel free to double the recipe too.  It freezes quite well. A great use for all those ground meat you bought on sale.  Plus you'll also have something waiting in the freezer for busy days such as my crazy Tuesday.  Wink.. wink... I always have some of these in 1 cup containers that I serve as a hearty dip for my growing happy eaters. 

        Happy cooking!

- Roz


Ingredients:

1 1/2 lbs ground beef
2 Tbs. olive oil
1 tsp garlic minced
1/2 cup onions chopped
1/2 tsp dried oregano
1/2 tsp dried rosemary
1/2 tsp dried thyme
1 28 oz can crushed tomatoes
2 Tbs course sea salt
1/2 tsp ground black pepper
3 Tbs fresh basil chopped

1. In a big pot, heat olive oil and brown the meat.
2. Once the ground beef has browned, add the garlic, onion, oregano, thyme, rosemary and tomatoes. Mix well and bring to a boil.
3. Season with 1 1/2  Tbs salt and ground pepper. 
4. Simmer for 30 - 90 minutes.  The longer you simmer it, the more flavorful it gets.  Mix every 10 minutes to prevent the sticking.
5. After your preferred simmering time, taste to make sure if you need the remaining 1/2 tsp of salt. Some canned crushed tomatoes have added salt.  The once I used only contains tomatoes that's why I need the extra 1/2 tsp.   Also, take note that I have used course salt in the recipe. 
6. Turn off heat, stir in the fresh basil and serve over pasta, rice and even steamed veggies. 

Quick tip:
     
       This recipe can easily be made in the crock pot. Just brown the meat before putting it in a slow cooker with the rest of the ingredients except the fresh basil. Season with 1 1/2 Tbs of salt instead of the mentioned 2 Tbs.  Mix in the basil just before serving.

Thursday, March 7, 2013

Food Allergy Friendly Fudgy Bean Brownies - Gluten, Dairy, Egg, Nut and Soy Free

        It's been a while since I last posted a brownie recipe or product review.  As I have mentioned in my previous posts, the most challenging part of being in a gluten, dairy, egg, nut and soy free diet is baking.   Unlike cooking wherein you can easily alter the outcome of a dish, baking is an exact science.  It's not just a matter of using the tastiest ingredients, it is about having the right proportions, mixing technique, proper heat, timing and pan size.  That being said I totally understand why some are scared to try baking from scratch or even baking at all. 
 
        For us food allergy Frugalista Moms, the need to bake and recreate some well loved treats or snacks is a big must.  Baking our own desserts or breads is not only for savings purposes but most importantly to have safe food for our children. With that in mind, I would like to share with you the recipe for one of our family's favorite after school and even lunch box snack  - Bean Brownies. 
 
       This version was adapted from my original recipe Black Bean Butterscotch Brownies found in my previous blog.  Since I have to remove the eggs, it took me about a dozen attempts to make the texture as close to the original as possible. Give this yummy, healthy vegan treat a try.  I'm sure you and your child will never look at brownies the same way again. 
 
       Enjoy!
 
-Roz
 
 
Ingredients:
 
1 15 oz can black beans
1 cup sugar
1 tsp vanilla extract
3 Tbs flax meal
9 Tbs lukewarm water
1/4 cup oil (you can use canola, sunflower or corn oil)
1/2 cup cocoa powder
1/4 cup buckwheat flour
1/8 tsp sea salt
1 tsp cinnamon powder
1/2 cup mini chocolate chips (Enjoy Life)
 
1. In a small bowl, combine flaxmeal and water to make a flax goo.  Set aside.
2. Rinse beans in running water.  Drain.
3. In a blender or food processor, puree the black beans, sugar, vanilla and oil until smooth. 
4. Transfer the bean mixture in a big mixing bowl and add the salt, cocoa powder, buckwheat flour and cinnamon.  Mix until just combined.
5. Pour the batter in a 9x9 greased pan and sprinkle the chocolate chips on top.
6. Bake for 30-35 minutes in a heated oven with a temperature of 350 degrees.  Do not overbake. 
7. Remove from the oven when the sides pulls away from the pan or there is a gap between the cake and the pan. 
8. Cool completely before cutting into bars. 
 
Optional:
 
Coconut drizzle
        Combine 3 Tbs coconut milk and 5 Tbs powdered sugar and mix until you have a smooth and creamy consistency. Drizzle on top of cooled and sliced brownies.  Let it set for about 5 -10 minutes before serving.  Depending on your preference, you can thin it out more by adding a few drops of coconut milk at a time or make it thicker by adding more powdered sugar.      
      

Monday, March 4, 2013

Super Easy Double Chocolate Pancakes

        I believe moms will agree that breakfast is the most challenging meal of the day.  Not only are we rushing to get something done, we also think about whether the kids will actually eat and finish their food just in time for the bus.  Sad to say but most of the time, most skip this important meal. 

        Before my children were diagnosed with food allergies, I confess I often rely on ready made waffles and pancakes.  You know, the ones that you just microwave or pop in a toaster.  Though they lack in flavor and loaded with "what are those ingredients?", I still admit that they are affordable morning life savers. 

         Fast forward to gluten, dairy, egg, nut and soy free diet, breakfast is still chaotic. Since this time, most packaged food is a big no-no, I have learned to do some shortcuts especially for breakfast.


        This Double Chocolate Pancakes were actually made with our favorite allergy friendly mix -  Cherrybrook Kitchen Waffle and Pancakes mix.  Instead of adding plain milk, water or milk substitute, I replaced the amount required with Chocolate flavored almond milk.  Yes, my children can take almond milk (Thank God!). Then added a few Enjoy Life Mini Chocolate Chips on top of the pancakes while cooking in the griddle.  Flip and wala easy and delicious breakfast!

          If you can't tolerate Almond Milk, don't worry, you can use any milk alternative --- flax, soy, coconut or even regular milk (if you are not dairy free) and dilute 1/2 tsp cocoa powder for every 1 cup of milk. The chocolate chips add a hint of sweetness which lessens the need for any syrup.  Thus lower sugar consumption for the little ones. 

       Here's an extra tip too.  Make a big batch of these pancakes when you have extra time in the weekends.  Instead of regular sized pancakes, I make it about 2-3 inches in diameter.  I found out that the consistency of mini pancakes reheats better than the bigger version .  Once the flapjacks cool, stack it up and transfer to either a ziplock bag or reusable covered container.  These pancakes store well in the fridge for 7 days.  When someone wants a quick snack or breakfast, place preferred number of pancakes on microwavable plate (single layer) and nuke on high for 10-15 seconds.  

        Take note, I didn't say freeze for later use.  After some trial and error, I realized that freezing these previously prepared gluten free, allergy friendly pancakes do not produce nice results once reheated.  I am not sure if it's the brand or ingredients in the mix but if you like to try, let me know okay. 

        Have a great week Frugalista Moms!

-Roz       
 

Friday, February 15, 2013

Sherry Shrimp Stir Fry

        It's the first Friday of Lent and that means it will be time to go meatless.  Growing up in a strict Catholic household, my grandmother never served meat on Fridays.  Yes, she did it the whole year! 
      
       As time passed and now that I cook for my own family, the tradition of not having meat on Fridays has become limited to the Lenten Season.  In fact, pre food allergy diagnosis, it slowly evolved into our family's Pizza night that's loaded with all kinds of meat and the works. Since we have already changed our family's menu for months now and I have been reading countless books on healthy living, allergies and weight loss (shhh.... the later is a secret!), I am thinking of restarting the meatless Friday tradition.  After all, non of the children is allergic to fish, shellfish and veggies.  Sounds good?
 
       Anyway, here's one of my favorite easy to make shrimp dish.  It's so versatile, one can serve it as an appetizer and even as a main dish when paired with rice/noodles and veggies.  Oh, these shrimps are even great with your favorite wine for that Friday night happy hour.      


Ingredients:
 
2 lbs fresh shrimp (easy peel with shells on)
3 Tbs extra virgin olive oil
1 tsp fine sea salt
1/2 tsp ground black pepper
1/4 cup sherry wine (vegetable broth if you don't like alcohol)
1 tsp garlic powder
1/2 tsp chili flakes
1/4 tsp ground cayenne pepper (you can use more)
1/4 cup chopped fresh parsley
 
1. Bring a big sautee pan or wok to medium heat. 
2. Once hot, add olive oil and shrimps.
3. Season with salt, black pepper, garlic powder and cayenne pepper. 
4. Pour in the wine or broth and let it reduce to half.  Keep mixing the shrimps so that it will cook evenly on all sides.
5. When the shrimps has turned pink evenly, sprinkle with chili flakes and chopped parsley.  Make sure not to overcook or else the shrimps will be tough.
6. Transfer to a serving plate and serve with a wedge of lemon.
 
Enjoy!
 
-Roz 


Wednesday, January 16, 2013

Feel Better Italian Wedding Soup - Gluten free


      I can't believe the flu bug just visited our place. Last week, 5 out of 6 family members were on bedrest for the whole week. With just one "nurse" to attend to everybody's needs, (yup I was the last one standing), I decided to make my favorite comfort food - Italian Wedding Soup.

       In this version, I used Arrowhead Mills Organic Quinoa -- 14 oz instead of the traditional small round pasta. I like the quinoa because it's gluten free, loaded with protein and doesn't get soggy when reheated.  Once the meatballs were cooked through, this recipe can also be transferred to a crock pot so it stays warm and ready when someone needs to eat.  A big help especially when having a nice family meal isn't possible.

        Whether you have someone who's sick at home or have a very hectic schedule, I suggest you give this easy to prepare comfort food a try.  I'm sure it will definitely make you feel better. 

        Stay healthy this winter.


Ingredients:
 
Meatballs
2 lbs ground beef
2 pcs multi grain crackers (crushed into bits)
1 medium sized onion
2 tsp sea salt
1/4 tsp ground black pepper
1 tsp garlic powder
2 Tbs ground flax meal
6 Tbs lukewarm water
fresh parsley (about 3 tablespoons finely chopped)
 
Soup
2 Tbs olive oil
3 cloves minced garlic
1 small onion chopped (about 1/4 cup)
1 cup celery chopped
1 cup carrots chopped
3.5 Quarts Chicken broth
2 tsp sea salt
1/2 tsp ground black pepper
2/3 cup quinoa
2 cups kale (torn into bite size pieces)
pinch of chili flakes
 
1. Mix the flaxmeal and water to make a goo. Set aside for 5 minutes.
2. Using a food processor, finely chop the parsley and onions. 
3. In a big bowl, combine the onion-parsley mixture, crushed multi grain crackers, flax goo, salt, pepper and garlic powder. 
4. Add the ground beef and using your hands, mix it thoroughly.  Form into balls about 1 tablespoon each. Set aside.
5. In a big pot, saute garlic, onions, celery and carrots in olive oil for about 5 minutes.
6. Add the stock and bring to boil. 
7. Once the stock starts to boil, slowly add the meatballs and quinoa. Let it boil again and season with salt and pepper.  Simmer for at least 20 minutes. 
8. Add the kale pieces and simmer for another 15 minutes.
9. Transfer to a serving bowl and top with chili flakes.
10. Enjoy!

-Roz


Tuesday, January 8, 2013

Winter Comfort food - Chicken Tinola

      My eldest daughter has fever since last night and is home right now.  Well, make that 2 sick daughters because my other one just arrived home from school with a high temperature. I was about to try my new recipes for stuffed peppers and pan seared salmon but have to change the menu to this all time favorite Chicken Tinola (Chicken with Ginger and Rice Soup).

      When I was growing up, this simple Filipino traditional chicken dish when served with rice is my perfect comfort food.  My grandmother used to make a big batch every time someone in the family has a bad cold or flu.  The warm clear soup loaded with ginger and spinach,  not to mention the healing powers of slow cooked chicken is perfect for this winter weather blues. 


Ingredients:

2 1/2 to 3 lbs Chicken pieces (I used bone in thigh and 2 breasts)
2  Tbs. olive oil
1 Tbs. garlic minced
1 medium sized white onion sliced into half moons
2 inch chunk of fresh ginger sliced
6 cups water
1/2 tsp ground black pepper
1/8 cup fish sauce (if you have fish allergy, feel free to use 3 Tbs sea salt)
1 lb fresh spinach

1. In a big dutch oven, saute garlic, onions and ginger for about 3 minutes. 
2. Add the chicken pieces skin side down and sear for 4-5 minutes.  Flip and sear the other side for 3 minutes.
3. Pour in water and stir. Make sure to scrape the inside bottom and sides of the dutch oven.
4. Bring to boil and simmer to 40 minutes to 1 hour.
5. Remove excess oil on top of the soup.  If you have time, you can let it cool and skim the fat on top.
6. Season with fish sauce (or sea salt) and ground black pepper.
7. Add the spinach, cover with the lid and turn off heat.
8. After 5 minutes, stir and serve with rice.

Stay healthy!

-Roz
    

Monday, October 15, 2012

Turkey and Pasta Dinner

     Pasta is always a favorite in our household.  It's versatile, affordable, healthy and easy to prepare. So when we first found out that our family needs to totally avoid wheat in our diet, the kids got worried if they will be able to enjoy their beloved recipes.  Thank God, there is now an abundant selection of gluten free pasta - corn, rice, brown rice, quinoa and more.   Oh, they do come in different shapes too.
 
      Though I have to admit these gluten free pasta are quite pricer than their regular wheat based counterpart, they do pass the taste challenge. In fact, my kiddos like them better than the whole wheat variety which tends to be too hard or grainy. With little alterations in ingredients, we are now able to enjoy pasta dishes that are gluten, egg, dairy, soy and nut free. 

       This ground turkey and pasta dinner is one of the easiest to prepare and is always a crowd pleaser. Yes even those who aren't concerned about food allergies love it. I tend to make a big batch all the time since my children request it for their school lunch the next day.  Plus the extra sauce is an excellent dip for chips too.


Ingredients:
1 16 oz package of fusilli pasta (I used the Wegman's Corn Pasta)
Big pot of hot water for cooking the pasta
1Tbsp. salt (for the pasta)

Sauce:
2 Tbsp. Extra virgin olive oil
1 tsp. minced garlic
1 lb ground turkey
1 23.5 oz Marinara Sauce (I used Wegman's Organic Chunky Marinara)
1 23.5 oz Wegman's Organic Grandpa's Sauce Goes Vegetarian
1 cup water (I used 1/2 cup each to "rinse" or get the leftover sauce out the jars)
2 tsp salt
1tsp ground black pepper
2 Tbsp fresh basil leaves (chopped)


1. Cook pasta according to package directions. Put the salt in the boiling water before adding the pasta.  In my case, I took out the pasta 2 mins before the suggested 14-16 minutes because I don't want my pasta to be very soft when I add it to the sauce.  Rinse the pasta in cold running water. Set aside.
2. In a large pan, heat olive oil and saute the garlic until fragrant. About 1 minute.
3. Add the ground turkey and brown the meat. Stir often to prevent sticking on the pan and to cook evenly.
4. Once the meat is cooked all the way through, pour in the marinara, grandpa's sauce and water. Bring to boil.
5. When the mixture starts to boil, season with salt and pepper.
6. Lower heat and simmer for about 5-7 minutes or until thick. Transfer about 2 cups of the meat sauce to a clean storage container. Set aside.
7. Add the cooked pasta to the remaining sauce in the pan. Mix well to coat all the noodles. 
8. After 5 minutes. Turn off heat and sprinkle the basil leaves.
9. Serve hot.

Notes:
   - I found out that rinsing the pasta is a very important step.  Not only it stops the cooking of the noodles prevents it from being soggy but it also removes some of the starchy or grainy taste most non wheat pasta often possess.
  
   - Feel free to use your favorite homemade pasta or marinara sauce.  I just specified the brand I used because it gave me good results, the ingredients complied with our family's food allergy requirements and each costs less than $3.00.  Making this dish really affordable. 
 
Try it and let me know what you think.
 
-Roz 
 
Related Posts Plugin for WordPress, Blogger...