Friday, April 26, 2013

Gluten and Nut Free, Vegan Fudge Chocolate Cake

       My family is not vegetarian much so vegan.  We are just normal foodies trying to eat healthier.  When my children were diagnosed with multiple food allergies, we have to eliminate eggs, dairy, soy, nuts, peanuts and yes, wheat.  Baking has been a real challenge since I have to come up with recipes that are not only vegan but also gluten, soy and nut free.  Oh I have to specify too that the taste must be close to the "real thing" since the kiddos used to eat the regular kind before and it will be hard to fool them.

         Chocolate Cake is always big in our house.  Pre food allergies, our favorite is Ina Garten's version.  The coffee in her recipe really brings out that deep indulgent chocolate flavor. For a while, we haven't had any of this treat because I have to replace almost everything in the recipe and deep inside I'm scared to make one for it may not turn out as good.  I don't want to be the one to finish a whole cake that's not worth every calorie!

        Then last week I came across Chef Chloe's new Vegan Dessert Cookbook.  Her recipe was quite simple but is not completely gluten free. I tried her recommended gluten free version and the result was quite good.  I didn't stop there though. By now, you all know that delicious food isn't enough.  I have to lessen the fat and sugar content.  Plus I need to sneak in some healthier ingredients. 

       So after a much tinkering, I finally came up with my own chocolate cake.  Since I serve this to the kids, I used decaffeinated coffee granules.  For a grown up version, you can use brewed strong coffee instead of the instant coffee.  You can also add a Tablespoon or two of Kahlua Coffee Liquor to start the party.    

       Since I'm running late, I'll post the recipe for the Creamy Chocolate frosting tomorrow.  If you're super excited to try this though, don't worry, my kids love it as it is. Just drizzle some melted dairy free chocolate and it's a treat.

       Enjoy your weekend!

- Roz


Ingredients:

1 3/4 cups gluten free flour mix (you can also use Bob's Red Mill Gluten Free All Purpose Baking Flour -- 44 oz )
1 1/2 cups turbinado sugar (or any raw sugar)
3/4 cup unsweetened cocoa powder
1/2 tsp. baking soda
1 tsp. baking powder
1/2 tsp. sea salt
1 tsp. ground cinnamon
1/4 cup coconut oil (you can also use canola or sunflower)
1/4 cup unsweetened applesauce
1 Tbs. apple cider vinegar
1 tsp. vanilla extract
1 cup coconut milk (you can also use almond, rice or flax milk)
1 cup hot water
2 Tbs. instant decaf coffee granules (you can also use regular coffee granules)

1. Preheat oven to 350 degrees.  Lightly grease 2 pans (9 inch) or if making cupcakes, line standard muffin pans with paper lines.  This recipe will produce about 24 cupcakes.
2. Sift flour, baking powder, baking soda, salt, cinnamon and salt.  Set aside.
3. In a small cup, combine coconut milk (other non dairy milk) and apple cider vinegar. Mix well.
4. In a separate cup, dilute coffee granules in hot water. 
5.With an electric mixer, cream the sugar, oil, vanilla and applesauce.
6.Alternately add the flour and coconut milk mixture.  Start and end with the flour.
7. Slowly pour the coffee mixture and mix just until combined. Make sure that you don't over mix.
8. Divide the batter to fill the two pans or when making cupcakes, fill each mold up 2/3 full.
9. Bake for 30-35 minutes or until a toothpick inserted in the middle comes out clean with a few crumbs.  For cupcakes, bake for 16-20 minutes and do the toothpick test. 
10. Remove from the oven and let it cool completely on a cooling rack before frosting.

Tuesday, April 23, 2013

Leftover Rice to Awesome Fried Rice

      Growing up in an Asian household, I was trained to respect food especially rice.  I can still remember the countless occasions my grandmother would tell me stories about the life cycle of rice. Whenever I refuse to finish the last morsel on my plate, she will make sure I will understand how much time, hard work, prayer, sacrifice and even tears shed for a cup of rice. 

      You know what?  Her efforts paid off, big time.  I rarely throw away rice.  What can I say? It just hurts my feelings! So, what then do I do with all the leftovers?  Fried Rice!

       Okay, I'm getting the secret out of the box now.  Since I get a lot of questions from my friends about their fried rice being too mushy and even sticky, I have to share with you what I learned from my grandma. The best way to get that familiar texture of fried rice from Asian restaurants and even take-outs is to use day or even days old cold steamed rice.

       By now, you must have seen that my family eats steamed rice everyday.  If there is a cup or more left, I put it in an airtight container and store it in the freezer until I have enough to serve six persons. In my experience, it can be frozen for a good month or two. 

       When it is time to make some fried rice, I just defrost the rice in the refrigerator overnight or in the microwave.  Then using your hands, mash the rice to remove the lumps. Don't remove the water.  Now you have prepared the perfect type of rice to make some fried rice. 

       Below is the recipe for a basic Garlic Fried Rice.  You can add whatever cooked vegetables or meat on hand to kick it up a notch.  Possibilities are endless so be creative. 

        Have a great week Frugalista Moms!

- Roz


Ingredients:
 
4 cups cooled cooked steamed rice
2 Tbs. canola oil
4 Tbs. garlic chopped
1/2 tsp. sea salt
 
 
1. Prepare your leftover rice. Make sure it is properly defrosted. Set aside.
2. Preheat a big sauté pan or wok.
3. Slowly cook the garlic in oil until light brown.  Be extra careful not to burn it. Remove the garlic and set aside.
4. In the same pan with the garlic oil, put the prepared rice and stir fry.
5. Stir in 3 minute intervals.  Make sure you scrape the bottom to prevent the rice from sticking and burning. 
6. Season with salt.
7. Cook for 15 - 20 minutes or until the rice is well heated through. 
8. Transfer rice to a serving platter and top with the reserved garlic.
 
Note: If you are adding other ingredients like vegetables and meat (chicken strips, ham, sausage), do it after  minutes of stir frying. 
 

Tuesday, April 16, 2013

The Elvis inspired Vegan Mini Donuts - Gluten Free

      Bananas, chocolate and peanut butter! What could possibly go wrong?  Taste wise, I'd say it's a piece of heaven.  Food allergy wise, it's a disaster especially to my egg, gluten, dairy, nut and peanut free gang. 
 
      After much coercing and whining from my beloved kids, I finally took the plunge to come up with an Elvis inspired treat.  Armed with my new favorite kitchen gadget -Babycakes DN-6 Mini Doughnut Maker, Yellow, 6 Donut, I decided to experiment and eventually perfect a recipe.  These mini donut treats are loaded with bananas and chocolate chips and topped with both pea butter (that's the only one we can have coz we're nut free remember?) and melted semi-sweet chocolate. Not to mention, these are baked not fried so lesser calories.  Are you excited?

     Before you scroll down, I have a little warning. Though these mini donuts are on the healthier side, they are highly addictive.  Yup, that's a disclosure.

      So what are waiting for?  Make some now and let me know if you love it or not. 


- Roz


Ingredients:

1 cup Teff flour
1/2 cup rice flour
1/2 cup potato starch
2 tsp. baking powder
1 tsp. baking soda
1/4 tsp. sea salt
2 Tbs. flax meal
6 Tbs. lukewarm water
1/4 cup coconut oil
3/4 cup sugar
1 1/2 cup mashed bananas
1 1/4  cup mini chocolate chips (allergy friendly brand)
1/4 cup pea butter (depending on your diet, you can also use other peanut butter substitute such as almond sun butter)

1. Sift teff flour, rice flour, potato starch, baking powder, baking soda and salt.  Set aside.
2. In a small bowl combine the flax meal and water to make flax goo. Set aside for at least 5 minutes before using.
3. With an electric mixer, cream the coconut oil and sugar.
4. Add the flax goo and mix it until light and fluffy.
5. Turn the mixer on low and slowly add the flour mixture. 
6. Add the bananas and mix well.
7. Stir in 1/2 cup of the mini chocolate chips.
8. In a preheated donut maker, spoon about 2 tablespoons of batter on each mold.
9. Close the lid and let it bake for 5 to 6 minutes.
10. Once the donuts are done, transfer to a cooling rack.
 
The recipe will make approximately 36 mini donuts.
 
While waiting for the donuts to cool, prepare the chocolate glaze.  Place the remaining chocolate chips in a microwave safe bowl and heat it until melted. I usually set the microwave on high and let it run in 10 second intervals until the chocolate chips looks really soft but still retain its shape. (30-60 seconds).  Mix to make sure the chips are melted.  Be extra careful not to overheat the chocolate.
 
To assemble, spread about 1/2 tsp. of pea butter on top of the donut and then dip it in melted chocolate. Return to the cooling rack until the chocolate sets or as long as you can wait. In my house, the kids rarely wait for the chocolate to set. 
 

Monday, April 15, 2013

A Night of Silence

     I was about to publish my latest recipe post when I learned about the tragedy at the Boston Marathon this afternoon.  As I glued myself on the television, I can't help but feel devastated over the whole incident.  What supposed to be the happiest section of the runners, their families, friends and even spectators (the finish line), became a source of major terror and pain. 
 
    In honor of those who passed, wounded and now grieving, I will offer a night of silence and prayer.  Please take a few moments out of your busy day and remember them too. 
 
 
-Roz
 
 
Reading by Candle Light  11"x14" and other sizes
Photo courtesy of Paintingwithacamera


Friday, April 12, 2013

Friday Freebies - Guide to Healthy Juicing Ebooks

       Spring has definitely arrived in New Jersey.  In fact for the past few days, people here in the East Coast have experienced summer like temperatures.  Can you believe that?

        As we expect warmer weather soon, I'm pretty sure we all need ideas for healthier cold drinks.  That's why I'm sharing for you my latest finds. Whether you are trying to lose weight, wanting to add more fruits and vegetables in your diet, or simply looking for new drinks to serve on your next gathering, these e-books are a big help.  Loaded with great recipes for juices and even smoothies, you'll definitely find something you'll love. 

       What are you waiting for? Download now before the prices go up. 

       Have a great Friday!

-Roz


Wednesday, April 10, 2013

Sausage and Peppers Casserole - Food Allergy Friendly Recipe

       Have you missed me? I know I was out of the circulation again. Why? Well, I have extra mommy duties lately because Child #3 is currently suffering from pneumonia. Ugh! The good news is that he's responding quite well with his medication and now on the way to full recovery.  Thank God! 

       Moving on, have you been enjoying the sudden weather change? For the past few days, the people here in New Jersey (and the entire East Coast) have been experiencing summer like temperatures. You know what that means right? Time to enjoy the outdoors and casual entertaining.  

       Since our grocery bill has tripled after the food allergy diagnosis, I am now challenging myself to create recipes which are not only safe for the kids to eat but are also crowd "pleasers" and most of all, will not burn my wallet.  Though buying organic and specialty ingredients are quite pricey, I can attest that these items usually are loaded with more flavor.  By adding less costly and  healthier "fillers", we can literally feed an army. 

        Check out my take on the common Sausage and Peppers. Instead of serving whole or big chunks of sausages on a roll, these are thinly sliced and are served on top of rice.  The onions and bell peppers not only add flavor but are filling too.  Yes, your guests should eat their veggies!  The flavorful cooking broth doubles up as a sauce that gives the rice a homey taste.  No waste thus making it very affordable.  

         Bring this dish to your next gathering.  I'm sure your friends as well as you wallet will love you. 

-Roz


Ingredients:

1 lb. Italian style Pork Sausage (sliced diagonally)
2 Tbs. extra virgin olive oil
3 big cloves of garlic (sliced thinly)
2 cups onions (sliced in in half moons)
5 bell peppers (sliced into strips)
1/4 tsp. chili flakes (you can add more)
1/2 cup marsala wine
1 cup chicken broth
1 1/2 tsp. sea salt  (you might use less depending on the brand of sausage and broth you are using)
1/2 tsp. ground black pepper
8 cups cooked rice (steamed)

1. Pan fry the pork sausage in heated pan with olive oil. Do it in batches so that the sausage will have nice sear marks.  Set aside.
2. In the same pan, saute the garlic, onions and bell peppers for 3- 5 minutes or until the onions are translucent.
3. Add the Marsala wine and chicken broth. Scrape the pan to get all the brown bits incorporated in the sauce. Bring to boil.
4. Put the cooked sausage pieces back in the pan. Season with salt, pepper and chili flakes.
5. Lower the heat and let the dish simmer for 10 minutes.
6. Mix well and turn off the heat.
7. Put some sauce on the bottom of a casserole pan.  Then arrange a nice layer of rice.
8. Top the rice with the sausage and pepper mixture.  Make sure to add all the sauce.
9. Serve hot.

Tips:
 - Slightly frozen sausage is easier to slice.  Place the sausage in the freezer for 2 hours before slicing.
  - Make sure to double check the ingredient list of the sausage you are using for allergens.  My favorite is the Wegmans brand because it is free of gluten, dairy and soy.
 - For this recipe, I used the Sweet style sausage because my kids can't handle the Hot/Spicy variety.


Thursday, April 4, 2013

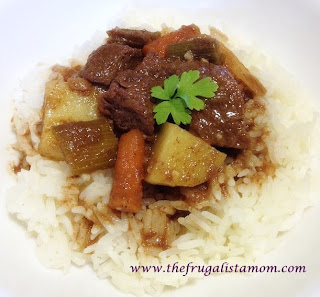
Food Allergy friendly Yankee Pot Roast

      Happy Easter Frugalista Food Allergy Moms!  I have been out of the blogging world in observance of Good Friday, Black Saturday, Easter and Spring Break.  It's so great to be back since the six day hiatus has given me the much needed reflection and focus.  There are tons of exciting ideas swirling in my mind right now and I can't wait to share them with you in the posts to come.
 
       To start off, here is my take on a Yankee Pot Roast recipe that was shared to me by my good friend Laurie Laliberte of Tales and Yarns.  Laurie and I have been following each other on twitter as a result of a craft site we both belong to. Yes! We are twitter buddies and boy I'm glad! 

      Call it luck or destiny. When I first ranted about my children's allergy diagnosis, she was one of the very supportive persons who came to my rescue.  Not only did she assured me that things will be fine, she has also encouraged me to start blogging about my experiences. Oh did I mention that she's a great Editor too? Having her input surely gave me the much needed confidence to write again. Fast forward to seven months and here I am --- sharing food allergy and even healthy recipes to the world.

       Thanks Laurie for helping me stay sane during those tough moments.  I hope all food allergy moms will have someone like you to enjoy this delicious Yankee (not Red Sox) Pot Roast with.

        How about you? Do you have a special food allergy friend? Love to hear from you.


- Roz


Ingredients:
 
3 lbs. beef chunks (cut in 2 inch cubes)
1Tbs. bacon grease
1 Tbs. garlic (minced)
1 medium onion (sliced)
2 Tbs. worcestershire sauce (make sure it's gluten free)
2 cups chicken stock
1/4 cup beer (optional but there gluten free brands)
2 tsp. celery salt
2 cups carrots (diced)
2 cups celery (diced)
3 cups potatoes (about 3 inch cubes)
1/2 tsp. salt
2 tsp. onion powder
1 tsp. sugar
1 tsp. chopped parsley
 
1. In a heated Dutch oven or heavy pot, brown the beef chunks in bacon grease.  Do it in batches so that the meat will have a good sear.
2. On the same pot, saute the onions and garlic. Add the browned meat.
3. Season with celery salt, onion powder, salt and sugar.
4. Add the beer and chicken stock.  Cover and bring the stew to a boil.  Once it boils, lower the heat at simmer for one hour. Stir occasionally, to prevent any meat from sticking to the pan.
5. After one hour, add the celery and carrots.  Mix well and simmer for 30 minutes.
6. Add the potatoes and simmer until the potatoes are cooked and the beef is tender. About 30 - 40 minutes.
7. Serve hot with rice or pasta. Sprinkle the chopped parsley just before serving. 
 
Slow Cooker Method:
After searing the meat and sautéing the garlic and onions, transfer it on a slow cooker.  Then layer the carrots, potatoes and celery.  Add the chicken stock and beer (optional).  Season with celery salt, onion powder and sugar.  Reserve the salt for later. Cook on low for 6-8 hours or until the meat is tender.  Before serving, taste if you need to add the 1/2 tsp. of salt.  Depending on the chicken stock that you use, you might not need it. 


Related Posts Plugin for WordPress, Blogger...